Each team has a folder: team_01, team_02, … team_06. Inside your folder you will find:
gh/— two Grasshopper cluster files (MCP tool definitions and results) plus a working test Grasshopper file (.gh) wired to run the Swiftlet MCP server for that team’s tools.python/— a small starter agent (LangGraph + MCP over HTTP) you extend for the studio project.
Work only in your team’s branch and your team’s folder. Do not edit other teams’ files. You may add files inside your team folder as needed. Shared changes for everyone should be coordinated with the instructors.
| Rule | Why |
|---|---|
| One branch per team | Keeps merges predictable. |
Edits only under team_XX/ |
Avoids conflicts until the final integration. |
Weekly PR into main |
Instructors review; PRs with changes outside your folder may be rejected. |
Weekly pull request: One PR per team per week into main, Sunday 11:59 PM Barcelona time. Instructors merge after review. Tools and agents are not graded every week; a fuller evaluation happens later, but following this structure keeps the project integrable.
team_base holds an older reference Python layout (different graph shape than the current team_XX/python tree). It does not contain Grasshopper .gh / .ghcluster files. Your Grasshopper starting files live under team_XX/gh/ in your team folder.
A single Grasshopper setup that exposes every team’s tools may be added later for final integration testing. Until instructors provide that, develop and test inside your team_XX/gh/ definition only.
Avoid duplicating another team’s tool. Talk to other teams so the final toolbox is complementary and works well together.
The shared goal is one repository where many MCP tools exist so agents can call tools built by different teams.
Clusters and the working definition sit under team_XX/gh/, not in a repo-wide gh/ folder.
Example for team 1:
team_01/gh/team_01_definition_cluster.ghclusterteam_01/gh/team_01_result_cluster.ghclusterteam_01/gh/team_01_working.gh— test harness and Swiftlet wiring; use it to run and test your clusters, but do not rework this file unless instructors say otherwise. Prefer editing the clusters. For help, ask the instructors (Scott is a good contact for Grasshopper/MCP).
New copies of teams may still use team_01_* filenames until you replace them with your own assets.
Follow the official docs: Swiftlet MCP node documentation. Below is a short reminder; use the wiki for full detail.
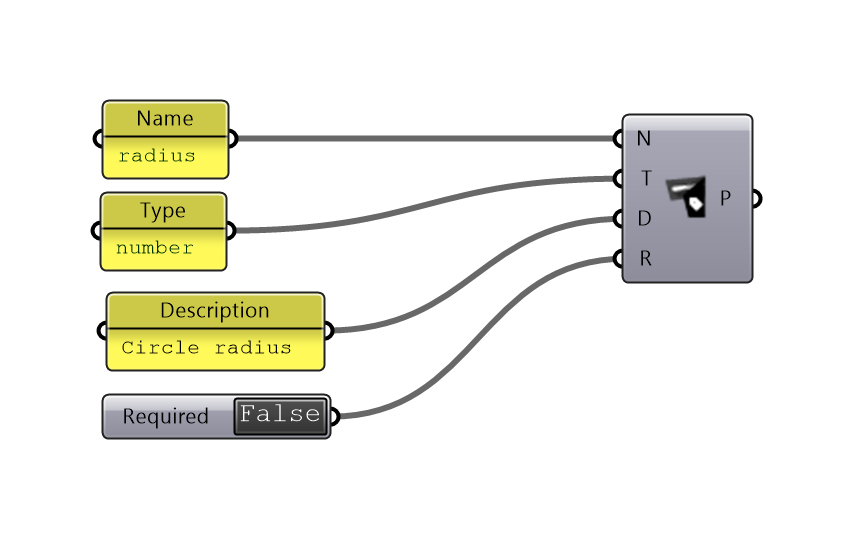
Each parameter needs a Name, Type, Description, and Required flag.
Each tool needs a Name (no spaces), Description (helps the LLM choose and use the tool), and inputs with clear types and descriptions.
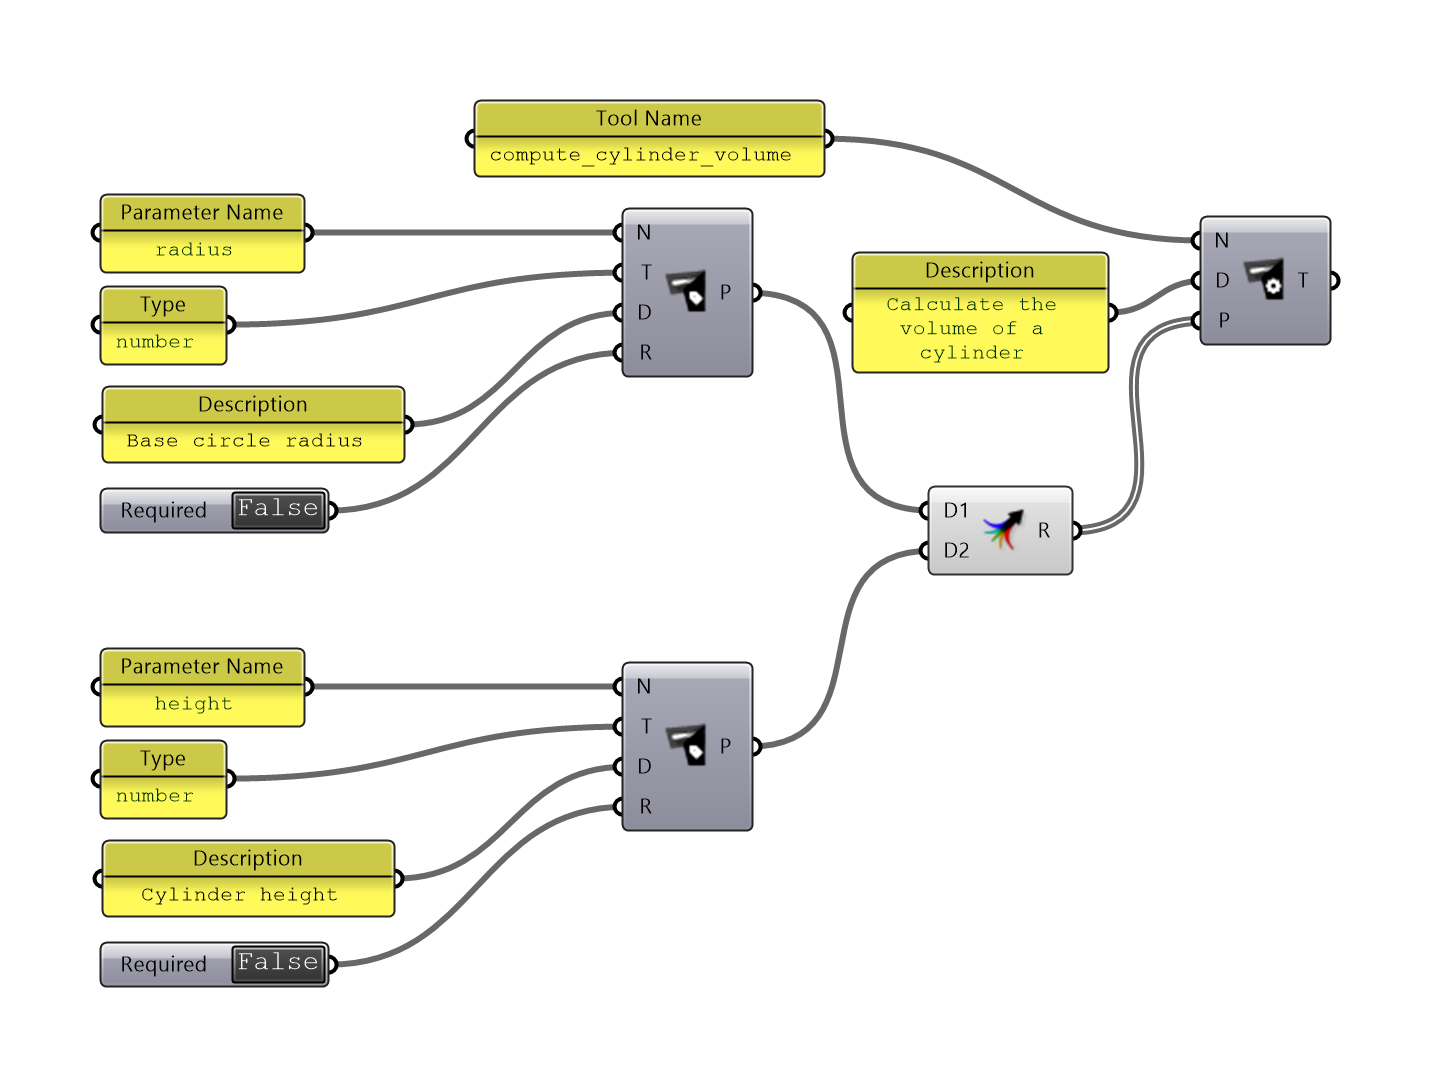
Definition and result clusters must stay in sync: tool names in the definition cluster must match the list used in the result cluster, and order in the result cluster must match how calls are routed (same order as the logic branches). The working .gh includes tree panels to compare names side by side.


Name outputs clearly so they align with what you promised in the tool description. Connect the OK output of the Tool Response node to the Gate Or input in the result cluster so successful calls log correctly in the Data Recorder.
Grasshopper’s MCP Server component talks to a separate Swiftlet process (on Windows this is typically a .exe). The client (LM Studio, Claude Desktop, or the Python agent) sends tool calls to Swiftlet; Swiftlet runs the matching logic in Grasshopper and returns the result.
sequenceDiagram
    participant LLM MCP Client
    participant Swiftlet MCP Server
    participant Grasshopper MCP Components

    LLM MCP Client->>Swiftlet MCP Server: Send tool call request with parameters
    Swiftlet MCP Server->>Grasshopper MCP Components: Route request to appropriate tool based on name and parameters
    Grasshopper MCP Components->>Swiftlet MCP Server: Execute tool and return results
    Swiftlet MCP Server->>LLM MCP Client: Send results back to client
The working definitions include a C# script that picks the first free port in a range (default 3001–3100) and feeds the MCP Server. Check the panel for the chosen port and use that port in your client’s mcp.json (or your duplicate port entries). You can change startPort / endPort in the script if needed.
Point your MCP client at the same host and port Swiftlet is using (from Grasshopper / the free-port panel). Use Grasshopper → right-click MCP Server → “Copy MCP Config” to build or update the server block for mcp.json.
If you paste a full new config over an existing mcp.json, you can wipe other servers—merge by hand or ask instructors for help.
mcp.json needs a fixed URL including the port. If the free-port script picks a different port each run, either update mcp.json to match or keep a few duplicate entries (e.g. 3001, 3002, 3003) and enable the one that matches today’s panel output (exact ports vary by machine).

LM Studio can run local models or connect to remote APIs. It is only for testing how your Grasshopper tools behave with an LLM—not the final studio “engine.” It can also target OpenAI-compatible endpoints (e.g. Cloudflare). Ask instructors if you want help wiring it to Swiftlet.
Same idea: connect to Swiftlet, call tools, debug workflows—testing only, not the final engine.
Use extra Grasshopper plugins only when necessary, document name + version, and verify compatibility with Swiftlet MCP on your machine. The instruction team cannot test every combination.
Each team uses team_01 … team_06 with the same layout. Code lives in team_XX/python/: a small loop (reason → tool → reason) over HTTP JSON-RPC MCP, with shared sample layout JSON as context.
The code is fail-fast by design: no automatic retries or recovery layer.
- Rhino + Grasshopper (with Swiftlet installed as required for the course).
- Python 3.10+ on your PATH (the project uses modern type syntax).
- A terminal and Git (or GitHub Desktop).
Do these in order:
- Clone the repo and checkout your team’s branch.
- At the repository root, copy
mcp.example.jsontomcp.jsonand edit the Swiftlet URL/port to match your machine (or use “Copy MCP Config” from Grasshopper after the steps below). - Copy
.env.exampleto.envat the repo root and fill inLLM_PROVIDERand the variables for that provider (see below). - Open Rhino, open your team’s
team_XX/gh/team_XX_working.gh, and run the definition so Swiftlet is listening on the expected port. - Create a virtual environment (recommended), activate it, then from the repo root run
pip install -r requirements.txt. - In a terminal:
cd team_XX/python(your team) and runpython main.py "your instruction here".
If main.py cannot reach the MCP server, confirm Grasshopper is running and mcp.json points at the correct HTTP endpoint.
Replace team_01 with your folder (team_02, …).
| Path | Role |
|---|---|
layout_input/layout_schema.json |
Only this file is loaded by the agent (bootstrap.py) as building context. Extra layout_schema.json copies under a team folder are not used unless you change the code. |
team_01/edited_layout.json |
Written when a tool returns (pretty-printed JSON when possible). |
team_01/grasshopper_mcp_requests.txt |
Example tools/call payload for debugging/docs. |
team_01/gh/ |
Grasshopper clusters and working definition. |
team_01/python/main.py |
CLI: prompt → bootstrap() → run_agent() → closes MCP client. |
team_01/python/graph.py |
StateGraph, AgentState, build_graph(), run_agent() — main place to change workflow. |
team_01/python/nodes/reason.py |
LLM step and structured decision (final vs tool). |
team_01/python/nodes/tools.py |
Runs MCP tools/call, injects layout_json from state, writes edited_layout.json. |
team_01/python/_runtime/bootstrap.py |
Builds Context (LLM, MCP, tools, layout, paths). |
team_01/python/_runtime/config.py |
Loads repo-root .env and mcp.json. |
team_01/python/_runtime/mcp_client.py |
HTTP MCP client (initialize, tools/list, tools/call). |
team_01/python/_runtime/llm.py |
OpenAI-compatible chat + JSON schema from discovered tools. |
Always run commands from team_XX/python so imports (graph, _runtime) resolve.
Create the venv once, in a folder you remember (repo root is a common choice):
Windows (PowerShell):
cd C:\path\to\AIA26_Studio
python -m venv .venv
.\.venv\Scripts\Activate.ps1
pip install -r requirements.txt
macOS / Linux:
cd /path/to/AIA26_Studio
python3 -m venv .venv
source .venv/bin/activate
pip install -r requirements.txt
Use the same activated environment whenever you run pip or python main.py.
Put .env at the repository root (next to requirements.txt). Start from .env.example.
Set LLM_PROVIDER to one of: local, google, cloudflare, openai, or anthropic. Each provider needs its own keys/endpoints as in .env.example. Pick one provider per team and stay consistent.
Cloudflare is a practical default: free tier, no credit card for the Workers AI path described in the course. Docs: Cloudflare Workers AI.
Anthropic is configured in code for an OpenAI-compatible style endpoint; if you see failures around structured JSON or tool schemas, switch provider or ask instructors—do not assume it will behave identically to OpenAI.
MAX_ITERATIONS caps tool rounds (default 4 if unset). DEBUG_GRAPH is read into settings but the graph does not print step traces yet; it is reserved until that wiring exists.
The agent reads mcp.json at the repo root. It must contain an mcpServers object. The code uses the first key in that object and takes the MCP HTTP URL from url or from args[0] (see mcp.example.json). To use another entry, put that server first or edit _runtime/config.py to select a server key explicitly.
mcp.json is gitignored (machine-specific). Use mcp.example.json as a template and Grasshopper’s Copy MCP Config when testing Swiftlet.
cd team_01/python
python main.py "delete the kitchen"
python main.py "add a window to Bedroom 1"
The run lists tools from the MCP server, injects layout_input/layout_schema.json into the prompt, prints the final reply, and writes tool output to that team’s edited_layout.json when the response is JSON (otherwise as text).
Reason calls the LLM. If the model returns action: "tool", tool runs MCP tools/call and appends messages; then reason runs again until action: "final".
flowchart LR
    START([START]) --> reason[reason node]
    reason -->|final_response set| END([END])
    reason -->|pending_tool_calls| tool[tool node]
    tool --> reason
- State:
messages,pending_tool_calls,final_response,iteration/max_iterations,tool_catalog,layout_json_string. - Allowlist: Only tools from
tools/listat startup; unknown names error out. layout_json: If the model putslayout_jsonin arguments, the tool node replaces it with the current full layout string from state.
nodes/reason.py is written to work with layout-editing tools exposed by Grasshopper. Examples include delete_room and add_window (names and parameters must match what your definition cluster publishes in tools/list).
delete_room: Resolve the room name (must match the layout JSON—e.g.rooms[].nameinlayout_input/layout_schema.json), call with schema-compliant arguments (oftenroom_name), then after the tool result reply withaction: "final"and point toedited_layout.jsonwhen appropriate.add_window: Adds a window to the layout (updates thewindowsarray and related fields per your MCP tool’sinputSchema). Use the parameter names and types fromtools/list/ your definition cluster; the layout’swindowsentries useid,name,geometry(two points), and optionalattributessuch asroomId, as in the sample schema.
Example shape for delete_room (URL/port depend on your setup); see also team_01/grasshopper_mcp_requests.txt (copies exist under other teams):
{
  "jsonrpc": "2.0",
  "id": 3,
  "method": "tools/call",
  "params": {
    "name": "delete_room",
    "arguments": {
      "room_name": "kitchen",
      "layout_json": "<stringified layout JSON>"
    }
  }
}
For add_window, the same JSON-RPC envelope applies; only params.name and params.arguments change to match your Swiftlet tool definition (still including layout_json when the tool expects the current layout string, same as above).
The Python client sends these over HTTP POST to the endpoint in mcp.json.
Before changing the graph or prompts, read graph.py, nodes/reason.py, and nodes/tools.py so you understand state and tool arguments.
LangGraph quickstart: https://docs.langchain.com/oss/python/langgraph/quickstart
The agent you develop will need to work with a CLI (command-line interface) where the user can type instructions and pass in files, such as the layout JSON. We need a CLI to create an orchestrator agent that can call your agent and the other teams' agents as sub-agents and allow them to work together. The CLI is also a simple way to test your agent without needing to set up a more complex interface.
In addition to the CLI, you should create a Graphical User Interface (GUI) that allows interaction with your agent. The GUI will allow your agent to display information, and receive user input. This is an opportunity to be creative and think about the human-computer interaction aspect of your agent. As we've discussed in the course, a big challenge is that LLMs are not good at understanding geometric information, and require written information to be able to reason about the geometry. A well-designed GUI can translate between the geometric and written information, and allow the user to interact with the agent in a more semantic way.
For example, the GUI could display the current layout, and allow the user to click on the south wall of the kitchen to add a window. Or the user the could write in a text box "add a window to the south wall of kitchen". Both examples convey the same information to the agent, but you may prefer one to the other.
Before you start coding, we recommend that you plan out your GUI on a sketch or paper. Think about the window(s) you may need, and what they will show. Think about the porportion of the window each element will need, and how large the total window should be. Think about the user flow: what will the user see when they first open the GUI, and what will they do next? You can consider the interface in a series of states, and how the user transitions between those states.
Below is a table of some libraries you could use to create a GUI for your agent, but not an exhaustive list, if you have other libraries in mind, that's great!
First, consider whether you want a local application that runs on the user's machine, like Rhino or Revit would, or a web-based application that runs in the browser, such as Miro or Google Docs. Local applications can be more responsive and have access to the file system, but web-based applications can be more accessible and run on more platforms.
Also consider the complexity of the interface you want to create. A simple library may be easier to learn and develop with, but may limit design options.
It's always a good idea to read documentation and tutorials and prototype before committing.
| Library | Description | Pros | Cons | Runtime | Complexity |
|---|---|---|---|---|---|
| Tkinter | Built-in Python library for creating GUIs. | No additional dependencies, simple to use for basic interfaces. | Limited in design and functionality, may not look modern. | Local | Low |
| PyQt | A set of Python bindings for the Qt application framework. | More powerful and flexible than Tkinter, supports complex interfaces. | Requires installation of PyQt, can be more complex to learn. | Local | Medium |
| Streamlit | A library for creating web apps for machine learning and data science. | Easy to use, great for data visualization, runs in the browser. | Not designed for complex GUIs, often refreshes the whole page on interaction which is slow. | Web-based | Medium |
| Gradio | A library for creating web-based interfaces for machine learning models. | Very easy to use, great for quick demos, runs in the browser. | Limited customization, not ideal for complex interfaces. | Web-based | Low |
| Holoviz Panel | A library for creating interactive web apps and dashboards. | Highly customizable, supports complex interfaces, runs in the browser. | Steeper learning curve, requires installation of Panel and its dependencies. | Web-based | High |
Since your agent will be manipulating the layout, it will help to have some options to visualize the layout in your GUI. Options range from simple ASCII text art to 3D models. The choice depends on your goals and design preference.
The simplest way to show the layout is to use the text, symbols and characters natively rendered in the GUI. You will have limited interactivity, but it can be good for debugging. For example, you could use # to represent walls, . to represent empty space, and W to represent windows. You could print the layout as a grid of characters, with each character representing a different element of the layout.
For example, a simple layout of two rooms with a door and a window could look like this:
###################
#........#........#
#........D........W
#........#........W
#........#........#
###################
A more advanced way to show the layout with linework in a 2D view. You could use a library like Matplotlib, Plotly, or PyQt's drawing capabilities to render the layout as a 2D floor plan. This would allow you to show walls, doors, windows, and other elements with more clarity than ASCII art. You could also add interactivity, such as clicking on a wall to select it or hovering over a room to see its name.
If using a web-based GUI, I recommend using Plotly for 2D visualization, as it has good support for interactivity and is supported by most web frameworks.

Another option is to generate an image of the layout using a Grasshopper and Swiftlet. Swiftlet 0.3.0 has the option to send images back to the client as base64-encoded strings through MCP. You could create a Grasshopper MCP tool that takes the layout JSON as input, renders a 2D floor plan image, and returns the image as a base64 string. Your Python agent could then decode the string and display the image in the GUI.
Similar to the image-based 2D option, you could create a Grasshopper MCP tool that takes the layout JSON as input, renders a 3D model of the layout, and returns a static image of the model as a base64 string. This would allow you to show the layout in 3D, but without interactivity.
The most complex way to show the layout is to render it in 3D with interactivity. I suggest using Three.js for web-based applications, or PyQt's 3D capabilities for local applications. You would need to convert the layout JSON into a 3D model, extruding walls and adding details like doors and windows. The biggest benefit of this approach is that it allows the user to explore the layout from different angles and perspectives, and allows for the user to interact with the model, such as clicking on a wall to select it.
If you go with this approach using Three.js, I recommend using VITE to set up a simple web server to serve the 3D model and handle interactions. Then you could embed the web-based 3D viewer into your GUI using a web view component or iframe, creating a website inside a website. You would also need to set up communication between the web-based 3D viewer and your Python agent, such as using WebSockets or HTTP requests. The VITE server would be launched by a python subprocess when the agent starts, and the 3D viewer would fetch the layout JSON from the Python agent to render the model.
sequenceDiagram
    participant Python Agent (GUI)
    participant Web-based 3D Viewer (Three.js)

    Python Agent (GUI) ->> Web-based 3D Viewer (Three.js): Setup VITE server and serve Layout JSON
    Web-based 3D Viewer (Three.js) ->> Python Agent (GUI): Render 3D model based on Layout JSON
    Python Agent (GUI) ->> Web-based 3D Viewer (Three.js): Update 3D model based on user interactions or agent decisions
    Web-based 3D Viewer (Three.js) ->> Python Agent (GUI): Notify when user interacts with the model
You agent must have a CLI that allows the orchestrator agent to call it as a subprocess. The CLI should accept user instructions and a layout JSON string as input, and return the agent's response as output along with a JSON string representing the edited layout if applicable.
- In
team_XX/python/main.py, switch from a single positional argument to explicit flags:
--prompt(required string)--layout_json(optional JSON string) Update any existing code that referencesargs[0]to useargs.promptinstead.
- Import
jsonand parse--layout_jsonwhen provided:
- Use
json.loads(args.layout_json). - If parsing fails, raise a clear
ValueError(or print an error and exit with non-zero code).
- Initialize context with
ctx = bootstrap()as before, then override layout context when CLI input is provided:
- If
--layout_jsonis present, setctx.layout_datato the parsed dict before callingrun_agent(...). - This ensures the run uses orchestrator-provided layout data instead of only
layout_input/layout_schema.json.
- Execute the graph with the parsed prompt:
response = run_agent(prompt_text, ctx)Keep the output safe for terminals.
- Print output using a stable machine-readable structure for orchestrators:
Final Response:
<agent response>

Edited Layout JSON:
<edited layout JSON or "No layout changes">
python main.py --prompt "add a window to the south wall of the living room" --layout_json '{
    "layoutId": "Layout-101",
    "outline": [[0.0, 0.0], [9.0, 0.0], [9.0, 5.0], [0.0, 5.0], [0.0, 0.0]],
    "rooms": [
      {
        "id": "room-1",
        "name": "Living Room",
        "geometry": [[0.0, 0.0], [5.0, 0.0], [5.0, 5.0], [0.0, 5.0], [0.0, 0.0]],
        "attributes": {"area": 25.0}
      },
      {
        "id": "room-2",
        "name": "Bedroom 1",
        "geometry": [[5.0, 0.0], [9.0, 0.0], [9.0, 5.0], [5.0, 5.0], [5.0, 0.0]],
        "attributes": {"area": 20.0}
      }
    ],
    "doors": [
      {
        "id": "door-1",
        "type": "wooden",
        "name": "Bedroom Door",
        "geometry": [[5.0, 2.0], [5.0, 2.9]],
        "attributes": {"connectsRooms": ["room-1", "room-2"]}
      }
    ],
    "windows": [
      {
        "id": "window-1",
        "type": "sliding",
        "name": "Living Room Window",
        "geometry": [[0.0, 2.0], [0.0, 3.5]],
        "attributes": {"roomId": "room-1"}
      }
    ],
    "furniture": [
      {
        "id": "furn-1",
        "name": "Main Couch",
        "geometry": [[2.0, 3.0], [4.0, 3.0], [4.0, 4.0], [2.0, 4.0], [2.0, 3.0]],
        "attributes": {"roomId": "room-1"}
      }
    ],
    "mep": [
      {
        "id": "mep-1",
        "name": "Living Room AC",
        "geometry": [[2.5, 4.5], [3.5, 4.5], [3.5, 4.8], [2.5, 4.8], [2.5, 4.5]],
        "attributes": {"system": "hvac"}
      }
    ],
    "structure": [
      {
        "id": "wall-1",
        "name": "North Interior Wall",
        "geometry": [[5.0, 0.0], [5.0, 5.0]],
        "attributes": {}
      }
    ]
}'
The agent should parse the --prompt and --layout_json arguments, run the agent graph, and print the final response and edited layout JSON to the console.
If there are any follow-up questions or clarifications needed, the agent should prompt the user for input in the console if launched from the CLI. This will allow the orchestrator agent to have a back-and-forth conversation with your agent if needed, and allow the user to provide additional information or clarification as the agent is running.
Example output:
Final Response:
"Added a window to the south wall of the living room."

Edited Layout JSON:
{
    "layoutId": "Layout-101",

    "outline": [[0.0, 0.0], [9.0, 0.0], [9.0, 5.0], [0.0, 5.0], [0.0, 0.0]],

    "rooms": [
      {
        "id": "room-1",
        "name": "Living Room",
        "geometry": [[0.0, 0.0], [5.0, 0.0], [5.0, 5.0], [0.0, 5.0], [0.0, 0.0]],
        "attributes": {
          "area": 25.0
        }
      },
      {
        "id": "room-2",
        "name": "Bedroom 1",
        "geometry": [[5.0, 0.0], [9.0, 0.0], [9.0, 5.0], [5.0, 5.0], [5.0, 0.0]],
        "attributes": {
          "area": 20.0
        }
      }
    ],

    "doors": [
      {
        "id": "door-1",
        "type": "wooden",
        "name": "Bedroom Door",
        "geometry": [[5.0, 2.0], [5.0, 2.9]],
        "attributes": {
          "connectsRooms": ["room-1", "room-2"]
        }
      },
      {
        "id": "door-2",
        "type": "wooden",
        "name": "Living Room Door",
        "geometry": [[5.0, 2.0], [5.0, 2.9]],
        "attributes": {
          "connectsRooms": ["room-1", "room-2"]
        }
      }
    ],

    "windows": [
      {
        "id": "window-1",
        "type:":"sliding",
        "name": "Living Room Window",
        "geometry": [[0.0, 2.0], [0.0, 3.5]],
        "attributes": {
          "roomId": "room-1"
        }
      },
      {
        "id": "window-2",
        "type:":"sliding",
        "name": "Living Room South Window",
        "geometry": [[2.0, 0.0], [3.5, 0.0]],
        "attributes": {
          "roomId": "room-1"
        }
      }
    ],

    "furniture": [
      {
        "id": "furn-1",
        "name": "Main Couch",
        "geometry": [[2.0, 3.0], [4.0, 3.0], [4.0, 4.0], [2.0, 4.0], [2.0, 3.0]],
        "attributes": {
          "roomId": "room-1"
        }
      }
    ],

    "mep": [
      {
        "id": "mep-1",
        "name": "Living Room AC",
        "geometry": [[2.5, 4.5], [3.5, 4.5], [3.5, 4.8], [2.5, 4.8], [2.5, 4.5]],
        "attributes": {
          "system": "hvac"
        }
      },
      {
        "id": "mep-2",
        "name": "Main Breaker Box",
        "geometry": [[0.2, 0.2], [0.8, 0.2], [0.8, 0.5], [0.2, 0.5], [0.2, 0.2]],
        "attributes": {
          "system": "electrical"
        }
      }
    ],

    "structure": [
      {
        "id": "wall-1",
        "name": "North Interior Wall",
        "geometry": [[5.0, 0.0], [5.0, 5.0]],
        "attributes": {}
      }
    ]
  }
To help evaluate your agent's performance, we can make an edit to the llm.py file to allow different providers and models to be used with each call of the call_llm function. This allows us to use small models for simple tasks and larger models for more complex tasks, and compare the results.
Please refer to the llm.py example file added to ./examples/updated_call_llm/llm.py for an example of how to modify the call_llm function to accept a provider and model argument. Then whenever you call optionally call_llm from a node, you can specify which provider and model to use for that call.