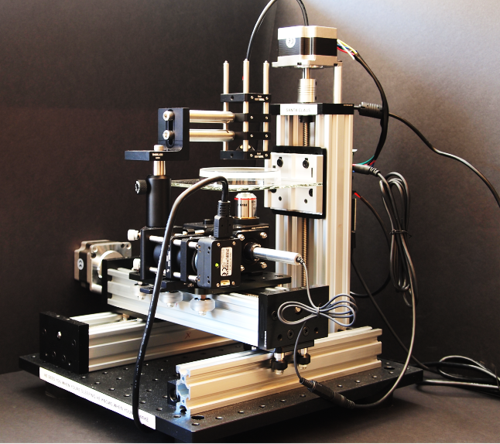
OpenAutoScope is a bright-field tracking microscope capable of delivering light stimulus to freely behaing c. elegans. This system is designed and assembled by Nate Cermak
and the ripository containing information on how to assemble the system is found here:
OpenAutoScope by Nate Cermak
For convenience I have copied the content of the mentioned repository here.
OpenAutoScope-NSnB repository is an open-source software developed during the NSnB 2022 program to pilot the system.
1- Clone this repository:
git clone https://github.com/mtorkashvand/OpenAutoScope-NSnB.git
2- Navigate into the clone repo and use the .yml file to create a conda environment named wormtracker:
cd OpenAutoScope-NSnB
conda env create -f environment.yml
3- Activate wormtracker environment and install the software inside it:
activate wormtracker
python setup.py develop
4- Open a File Explorer window and navigate to OpenAutoScope-NSnB -> wormtracker_scope -> bin -> debug, then click on the address bar and copy the absolute path to this folder.
5- In the Windows search bar type edit the system environment variables and open it.
6- Click on Environment Variables ...
7- In the opened window, under System Varibales click on New ...
8- Set the variable name to WORMTRACKER_BIN and set the variable value to the absolute path copied in step 4, and click on OK
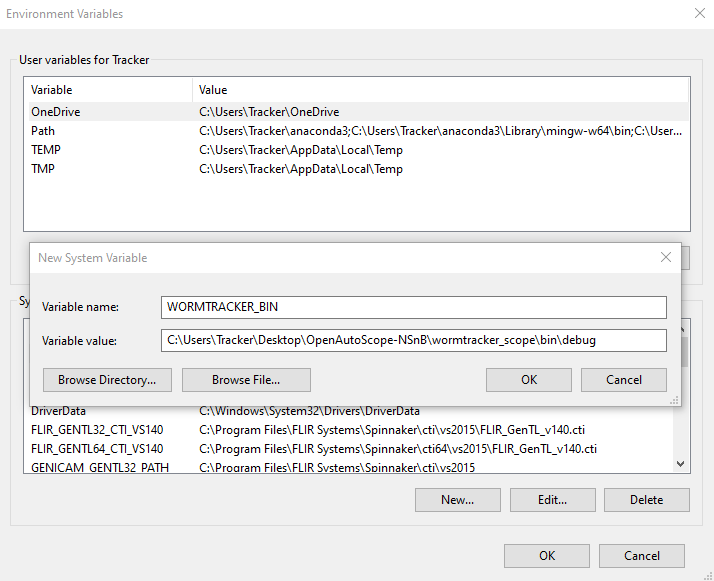
9- Next, look for the Path variable under the System Variables, double-click to open it, click on New and add %WORMTRACKER_BIN% and click on OK
The Installation is completed
- Open a command prompt, and activate
wormtrackerenvironment
activate wormtracker
- Run the system using the following command:
wormtracker --directory=<data output path> --exposure=<exposure time in microseconds>
exapmle: if you want your data to be saved in a folder named data in the C drive, and the exposure time is 1500us, then the command to run the system is:
wormtracker --directory=C:\data --exposure=1500
Note: A default value for the exposure time and the data directory could be set in wormtracker.py file which is located here:
OpenAutoScope-NSnB -> wormtracker_scope -> system
If you want to run the system with those default values, you can run the system just by typing: (step 1 is still necessary)
wormtracker
Once you run the system, a displayer window pops up and streams the camera feed. At this point, the command prompt window is just to print messages and we do not use it to send any commands. To make the operation easier, a Xbox controller is used to send different commands to the system. The below figure explains which buttons are programmed, and what each one does.
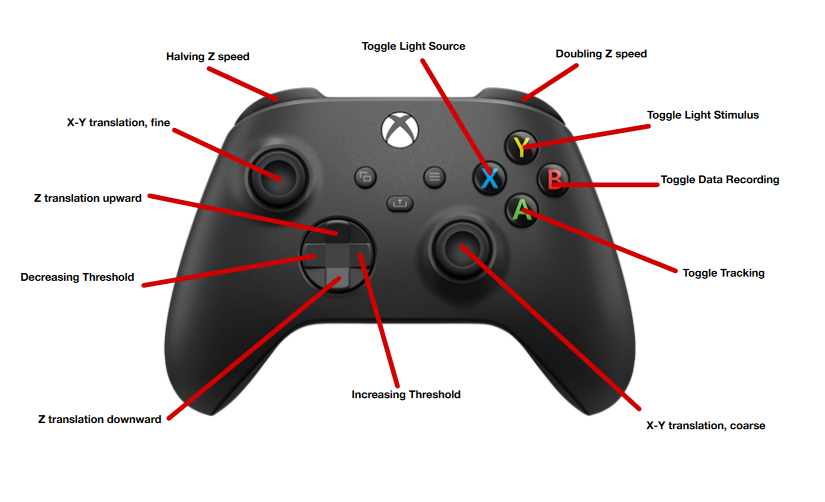
- Once the system is running and you see the
FlirCamera: Initialized.in the command prompt, pressXon the Xbox controller to turn on the light source. - You can adjust the Z speed by the left-right shoulders, set the speed to 256 and move upward until you are focused in Z. For a better focus you might want to move slower once you are closer to the focus point.
- Use the fine or coarse X-Y translation to locate the worm. A black rectangle shows the detected object by the tracking algorithm. If the animal is perfectly inscribed inside the rectangle, you can go ahead and press
Ato start tracking. - The tracking algorithm tracks the animals in X, Y and Z directions. You can start recording the data by pressing
Bon the Xbox controller.
Note: The tracking and recording could be toggled using the Xbox controller, but at the same time the status is printed on the command prompt as well. - At any point, use the
Ybutton to toggle the light stimulus during the experiment.
Note: Each time you toggle the recorder, a new file is created. - Once you are done, you can type
DO shutdownin the command prompt to shutdown the system.
This software uses the HDF data format to save the recordings, but for convenience a video writer is added to the software to convert your recordings into MP4 movies. The MP4 movies are not generated for all recordings automatically in real time. To generate a MP4 movie for a recording:
1- Activate the wormtracker environment
activate wormtracker
2- Locate the dataset of interest and copy its name and run the following command:
wormtracker_video_writer --directory=<absolute data path> --file=<file name> --fps=<required frame rate for the movie>
For example if the data file is saved at C:\data and the file name is flircamera_2022_12_07_14_05_25.h5 and the frame rate for the movie is decided to be 10Hz, then the following command generates the MP4 video for this specific dataset in the same directory:
wormtracker_video_writer --directory=C:\data --file=flircamera_2022_12_07_14_05_25 --fps=10
There are 2 parameters that could be adjusted for each experiment for a better tracking result.
- The cameras exposure time: In 'Running the system` one of the parameters is the exposure in microseconds. To decide the best value for this parameter, look at the displayer when you toggle the light source (The X button on the Xbox controller). If when you turn on the light source, you see that for a few frames right after that, the displayer is saturated (the displayer shows a all-white screen), it means that the exposure is too high and the displayer needs to adjust the output. Shutdown the system, and decrease the exposure until the situation with saturation is improved.
- The second parameter is the threshold value that is used to convert the greyscale image taken by the camera to a binary image. The threshold value could be adjusted using the left-right pads on the xbox controller. The tracker is robust to small changes in the value of the threshold close to the middle of the range (it can have values from 0 to 255). If the detected rectangle is far bigger than the animal, increase the threshold value. If the detected rectangle does not include some parts of the worm (the worm is not inscribed in it), try decreasing the value of the threshold parameter.
Note: unlike the exposure time, to change the threshold value you do not need to shutdown the system.
-
Before running the system, the motors could be rotated manually, but when the system is running, the motors are locked. The location of the motors at the time that the system is initiated are set as zeros. The Z motor does not go lower than this initial position for safety reasons, and the X-Y values change by around 2cm in each direction. So before you run the system, manually lower Z to a point that it is right above the objective but not touching, and try to move the x-y motors until the objective is centered relative to the worm plate. At the end of the experiment, when the
DO shutdowncommand is send to shutdown the system, the motors move back to their 0 position. What it means is that as long as motors are not moved manually between experiments, you only need to set the initial position manually once. -
The teensy is connected to the computer with a micro USB cable, there is a parameter named
teensy_usb_portin thewormtracker.pyfile (OpenAutoScope-NSnB -> wormtracker_scope -> system) which needs to be set to the port number for this USB cable. As long as it is not disconnected and connected to another port, this variable has to be set once
The author of this README.md file is Mahdi Torkashvand (mmt.mahdi@gmail.com) Please reach out with your questions/suggestions.