% FFCOMMANDER(1) ffcommander 2.52 % Mikael Hartzell (C) 2018 % 2021
FFcommander is an easy frontend to FFmpeg and Imagemagick to automatically compress videos to H.264 - format and manipulate DVD, Bluray and DVB subtitles. FFcommander supports all video formats FFmpeg recognizes including: DVD and Bluray rips (mkv), DVB files, etc.
Linux.
ffcommander [ options ] [ file names ]
The output files are places in directory: 00-processed_files
I wrote FFcommander out of frustration to Handbrake and its limitations. FFcommander does for me everything Handbrake does and also tries to be clever and choose many settings automatically. FFcommander does the following things by default (these can also be turned off if you prefer to set these parameters yourself):
- Recognize audio and subtitle language and let the user choose these by language code (eng, fra, ita, etc).
- Calculate optimal video bitrate automatically based on video resolution (may also be defined manually).
- Always deinterlace.
- Always use 2-pass video encoding to get the best quality in the smallest possible file size. Constant quality compression is also available but in my opinion nothing beats 2-pass quality when you have dark scenes in the video.
- Always copy original audio to the processed video to keep audio quality at its best. You can also recompress audio and let FFcommander automatically calculate bitrate based on the number of channels (-aac or -ac3 or -opus).
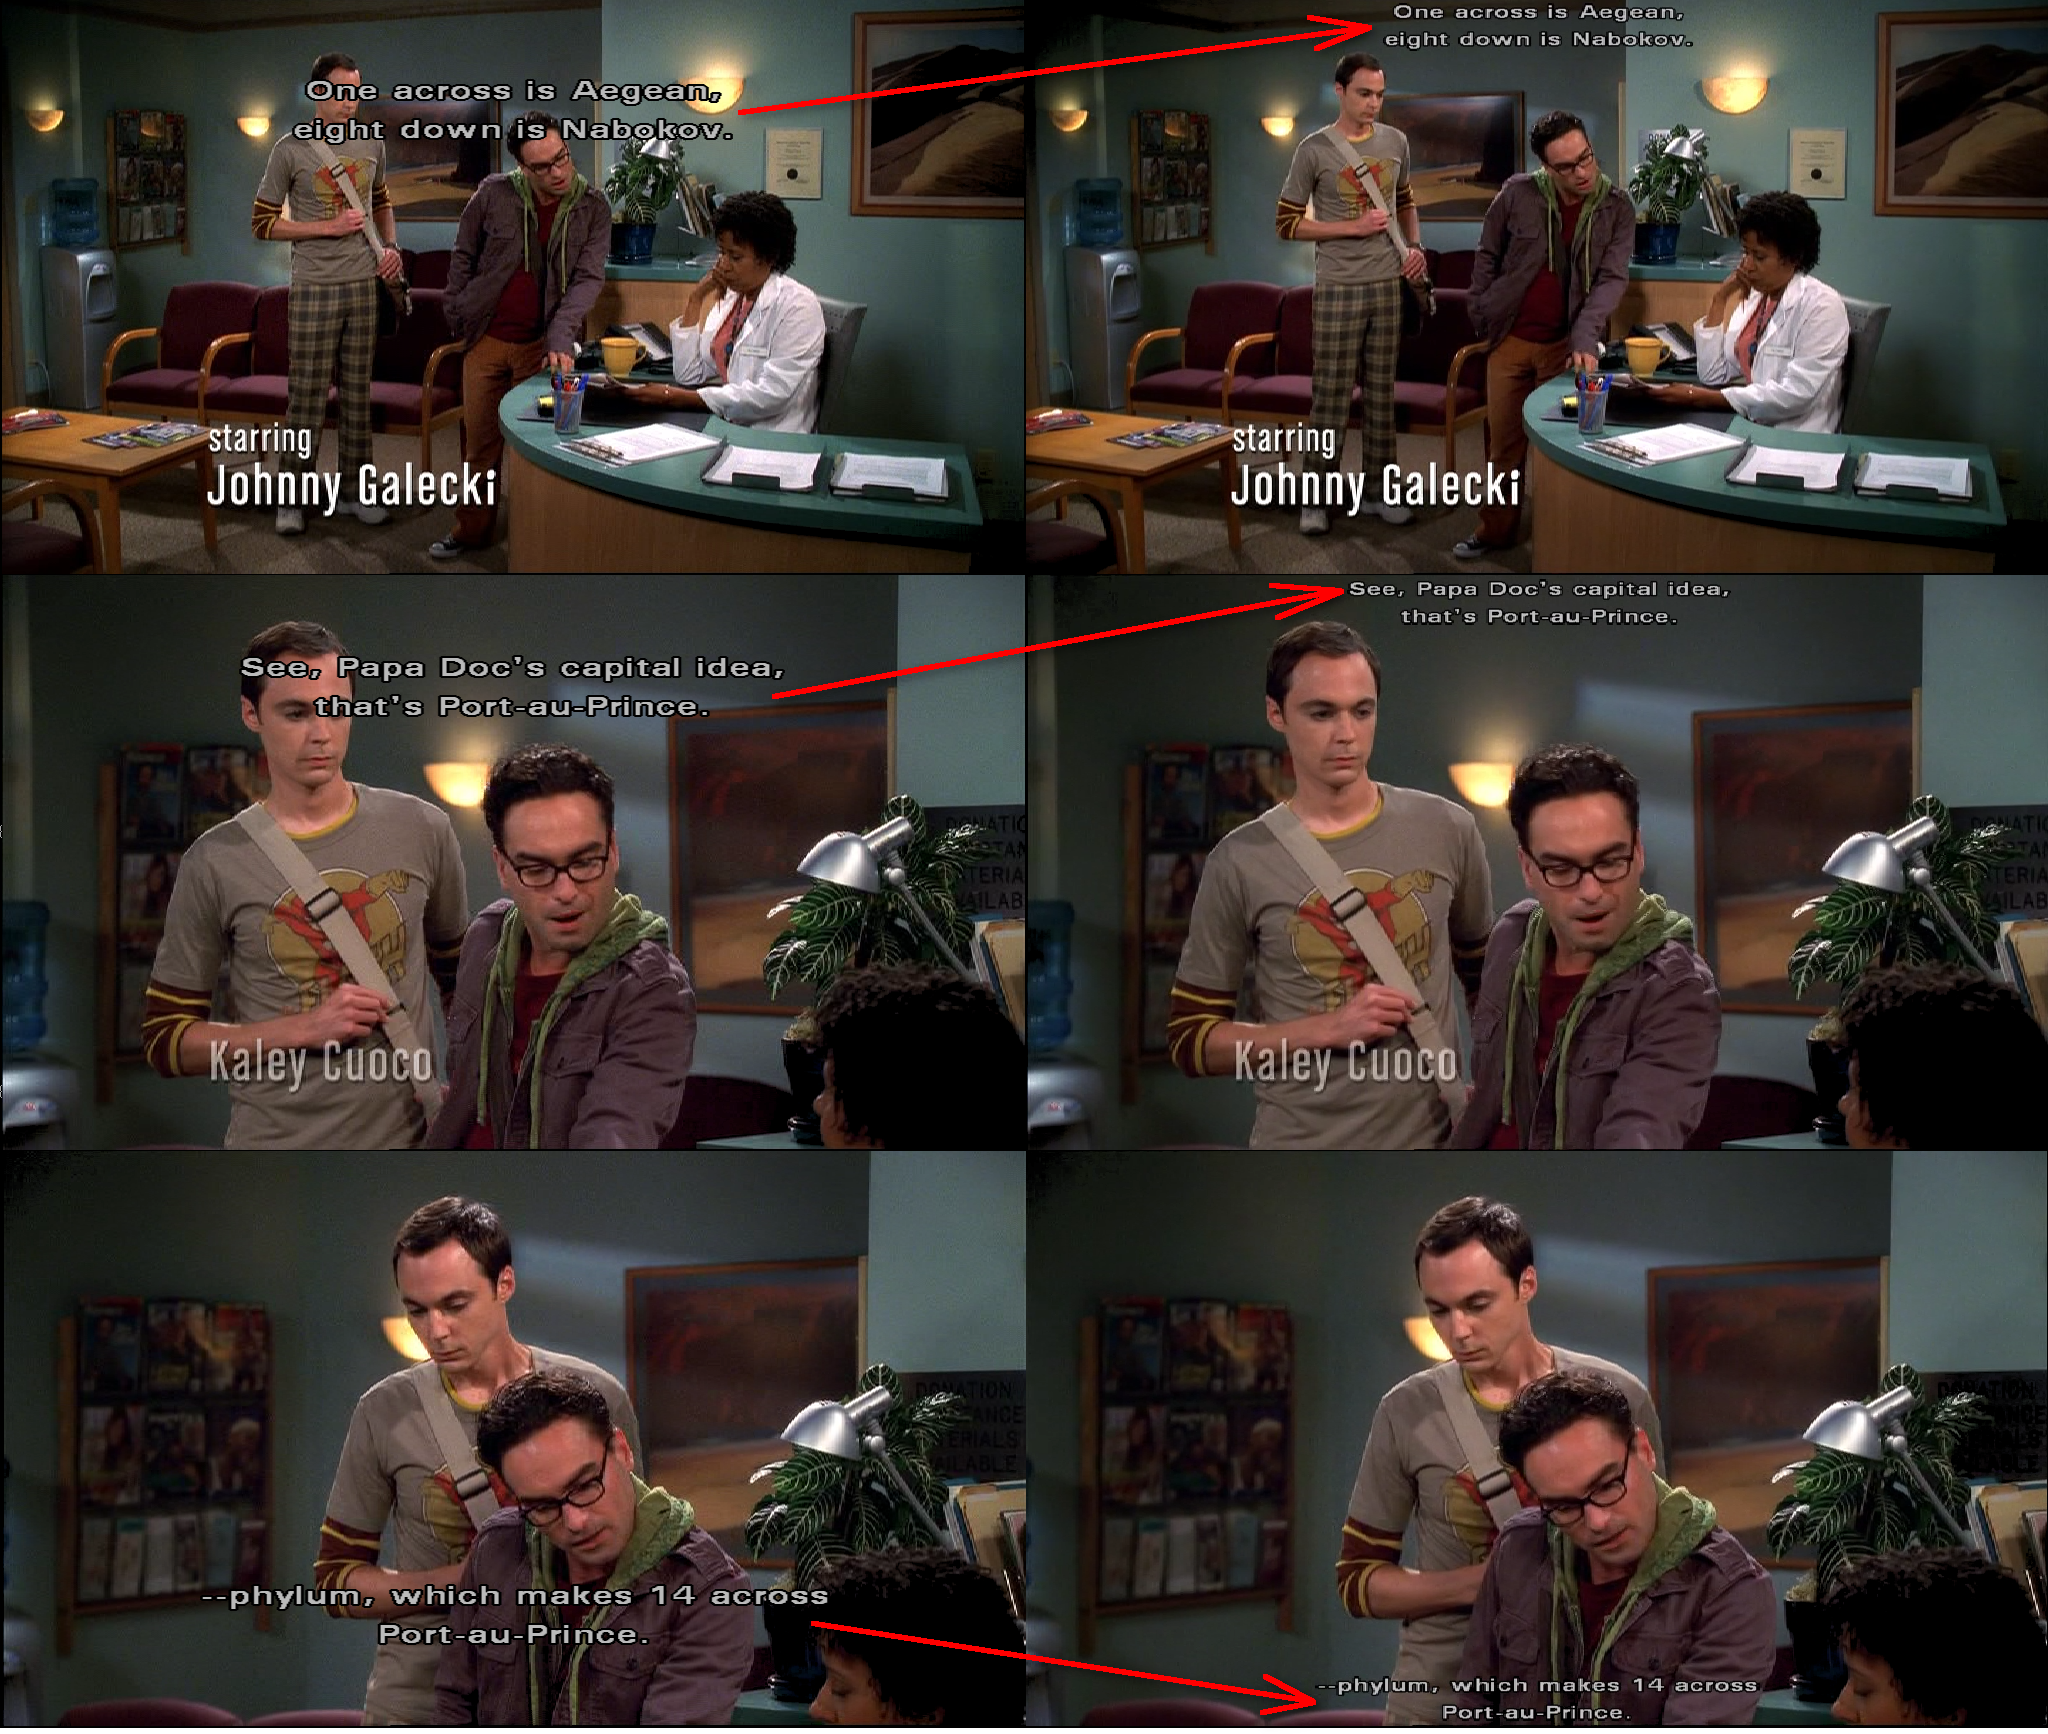
- The -sp and -sr options let you burn subtitles on top of video while resizing and moving subs up or down right to the edge of the screen. This prevents subtitles ever being displayed on top of an actors face. The subtitle position at the edge of the video is automatically calculated based on video resolution. See picture here
- Cut out parts of a longer video and create a compilation of these parts (option -sf).
- Create an HD and SD - version of a video at the same time. (-psd). Processing for both versions is done simultaneously.
- Mux multiple DVD or Bluray subtitle images (bitmaps) into the processed file (-sm or -smn). This lets you turn subtitles on or off while watching the video.
- Scan source files and display video, audio and subtitle info to find files that you can process using the same options in one go (-scan).
- Burn timecode on top of video (-tc). Autocrop (-ac) or change video to grayscale (-gr), denoise (-dn) or inverse telecine video (-it).
- Burn subtitles on top of video while converting them to grayscale (-sgr).
- Learn how FFmpeg commandline works by printing out commandlines that FFcommander creates for FFmpeg (-print).
FFmpeg 4, ImageMagick 7 (or any later version of these programs). Go - language version 1.16 or later is needed for building the source code (binary release of the program is also available).
FFcommander source code does not have any dependencies but it needs FFmpeg and ImageMagick to process files. ImageMagick is only needed when processing subtitles with the -sp option.
- Install programs: sudo pacman -S ffmpeg imagemagick
You can either use the binary version of FFcommander or build it yourself from source.
- Download FFcommander binary: wget -c https://raw.github.com/mhartzel/ffcommander/master/binary_release/ffcommander.tgz
- Unpack binary: tar xzf ffcommander.tgz
- Copy the executable to /usr/bin/: sudo cp ffcommander /usr/bin/
- Install build tools: sudo pacman -S git go go-tools
- Get source code: git clone https://github.com/mhartzel/ffcommander.git/
- Go to source directory: cd ffcommander
- Build the program: go build ffcommander.go
- Copy the executable to /usr/bin/: sudo cp ffcommander /usr/bin/
We need to build ImageMagick from source since ImageMagick version 7 is not available in Ubuntu repo. Only the older version 6 is avaible at this time (Ubuntu versions 20.04, 20.10, 21.04, 21.10). The "ImageMagick Easy Install" script (https://github.com/SoftCreatR/imei/) makes building ImageMagick very easy.
- Remove previous installation of ImageMagick 6: sudo apt remove imagemagick
- Install programs and build tools: sudo apt install git ffmpeg build-essential
- Download FFcommander binary: wget -c https://raw.github.com/mhartzel/ffcommander/master/binary_release/ffcommander.tgz
- Unpack binary: tar xzf ffcommander.tgz
- Copy the executable to /usr/bin/: sudo cp ffcommander /usr/bin/
Then get the imei build script and build ImageMagick.
- Get the build-script: git clone https://github.com/SoftCreatR/imei
- Go to source directory: cd imei
- Make script executable: chmod +x imei.sh
- Start the build-script: sudo ./imei.sh
- The man page has exactly the same text as the README.md included in the git repository. However if you want to install the man page in your system then do the following:
- Get the source code: git clone https://github.com/mhartzel/ffcommander.git/
- Go to man page directory: cd ffcommander.git/manual_page/
- Use the command: manpath to display directories that the man - command searches your system for manual pages, pick a path and copy the manpage there. For example: sudo cp ffcommander.1.gz /usr/local/man/man1/
- Update the manual database: sudo mandb
-abk Adjust video black point to make light video darker. This will move dark tones closer to black. Range is from -1.0 to 1.0. 0 = no change, numbers bigger than 0 makes video darker. Example: -abk 0.3
-ac Autocrop. Find crop values automatically by doing 10 second spot checks in 10 places for the duration of the file.
-ach Adjust Chroma to increase or decrease the amount of color in the video. Range is 0.0 to 3.0. Value of 1 means no change. Values less than 1 decrease and values bigger than 1 increases the level of color in the video. Example -ach 0.85
-agm Adjust video gamma. This will make mid tones lighter or darker. Range is from 0.1 to 10. 1 = no change, numbers bigger than 1 moves mid tones towards white. Example: -agm 1.05
-awh Adjust video white point to make dark video lighter. This will move light tones closer to white. Range is from -1.0 to 1.0. 1 = no change, numbers smaller than 1 makes video lighter. Example: -awh 0.7
-crf Use Constant Quality instead of 2-pass encoding. The default value for crf is 18, which produces the same quality as default 2-pass but a bigger file. CRF is much faster that 2-pass encoding.
-dn Denoise. Use HQDN3D - filter to remove noise from the picture. This option is equal to Hanbrakes 'medium' noise reduction settings.
-gr Convert video to Grayscale. Use this option if the original source is black and white. This results more bitrate being available for b/w information and better picture quality.
-it Perform inverse telecine on 29.97 fps material to return it back to original 24 fps.
-mbr Override automatic bitrate calculation for main video and define bitrate manually.
-nd No Deinterlace. By default deinterlace is always used. This option disables it.
-psd Parallel SD. Create SD version in parallel to HD processing. This creates an additional version of the video downconverted to SD resolution. The SD file is stored in directory: '00-processed_files/sd'
-sbr Override automatic bitrate calculation for parallely created sd video and define bitrate manually.
-ssd Scale to SD. Scale video down to SD resolution. Calculates resolution automatically. Video is stored in directory 'sd'
-tc Burn timecode on top of video. Timecode can be used for example to look for exact edit points for the file split feature.
-a Select audio with this language code, example: -a fin or -a eng or -a ita Only one audio stream can be selected. Only one of the options -an and -a can be used at the a time.
-an Select audio stream by number, example: -an 1. Only one audio stream can be selected. Only one of the options -an and -a can be used at the a time.
-ac3 Compress audio as ac3. Bitrate of 128k is used for each audio channel meaning 2 channels is compressed using 256k bitrate. 6 channels uses the ac3 max bitrate of 640k.
-aac Compress audio as aac. Bitrate of 128k is used for each audio channel meaning 2 channels is compressed using 256k bitrate, 6 channels uses 768k bitrate.
-opus Compress audio as opus. Opus support in mp4 container is experimental as of FFmpeg vesion 4.2.1. Bitrate of 128k is used for each audio channel meaning 2 channels is compressed using 256k bitrate, 6 channels uses 768k bitrate.
-flac Compress audio in lossless Flac - format
-na Disable audio processing. There is no audio in the resulting file.
-ls Force encoding to use lossless utvideo compression for video and flac compression for audio. This also turns on -fe (1-Pass encode). This option only affects the main video if used with the -psd option.
-s Burn subtitle with this language code on top of video. Example: -s fin or -s eng or -s ita Only use option -sn or -s not both.
-sd Subtitle downscale. When cropping video widthwise, scale subtitle down to fit on top of the cropped video. This results in a smaller subtitle font. The -sd option affects only subtitle burned on top of video.
-sgr Subtitle Grayscale. Remove color from subtitle by converting it to grayscale. This option only works with subtitle burned on top of video. If video playback is glitchy every time a subtitle is displayed, then removing color from subtitle may help.
-sn Burn subtitle with this stream number on top of video. Example: -sn 1. Only use option -sn or -s not both.
-so Subtitle offset, -so 55 (move subtitle 55 pixels down), -so -55 (move subtitle 55 pixels up). This option affects only subtitle burned on top of video. Also check the -sp option that automatically moves subtitles near the edge of the screen.
-sm Mux subtitles with these language codes into the target file. Example: -sm eng or -sm eng,fra,fin. This only works with dvd, dvb and bluray bitmap based subtitles. Mp4 only supports DVD and DVB subtitles not Bluray. Bluray subtitles can be muxed into an mkv file using the -mkv option.
-smn Mux subtitles with these stream numbers into the target file. Example: -smn 1 or -smn 3,1,7. This only works with dvd, dvb and bluray bitmap based subtitles. Mp4 only supports DVD and DVB subtitles not Bluray. Bluray subtitles can be muxed into an mkv file using the -mkv option.
-palette Hack the dvd subtitle color palette. The subtitle color palette defines the individual colors used in the subtitle (border, middle, etc). This option takes 1-16 comma separated hex numbers ranging from 0 to f. Zero = black, f = white, so only shades between black -> gray -> white can be defined. If you define less than the required 16 numbers then the rest will be filled with f's. Each dvd uses color mapping differently so you need to test which numbers control the colors you want to change. Usually the first 4 numbers control the colors. Example: -palette f,0,f . This option only affects subtitle burned on top of video.
-sp Subtile Split. Subtitles on DVD's and Blurays often use an unnecessary large font and are positioned too far from the edge of the screen covering too much of the picture. Sometimes subtitles are also displayed on the upper part of the screen and may even cover the actors face. See picture here. The -sp option detects whether the subtitle is displayed top or bottom half of the screen and then moves it towards that edge of the screen so that it covers less of the picture area. Distance from the screen edge is calculated automatically based on video resolution (picture height divided by 100 and rounded down to nearest integer. Minimum distance is 5 pixels and max 20 pixels). Subtitles are also automatically centered horizontally. Use the -sr option with -sp to resize subtitle. The -sp option affects only subtitles burned on top of video.
-sr Subtitle Resize. Values less than 1 makes subtitles smaller, values bigger than 1 makes them larger. This option can only be used with the -sp option. Example: make subtitle 25% smaller: -sr 0.75 make subtitle 50% smaller: -sr 0.50 make subtitle 75% larger: -sr 1.75. This option affects only subtitle burned on top of video.
-f This is the same as using options -fs and -fe at the same time.
-fe Fast encoding mode. Encode video using 1-pass encoding. Use this for testing to speed up processing. Video quality will be much lower than with 2-Pass encoding.
-fs Fast seek mode. When using the -fs option with -st do not decode all video before the point we are trying to locate, but instead try to jump directly to it. This will speed up processing but might not find the defined position accurately. Accuracy depends on file format.
-scan Scan input files and print video audio and subtitle stream info.
-sf Split out parts of the file. Give start and stop times for the parts of the file to use. Use either commas and slashes or only commas to separate time values. Example: -sf 0-10:00,01:35:12.800-01:52:14 defines that 0 secs - 10 mins from the start of the file will be used and joined to the next part that starts from 01 hours 35 mins 12 seconds and 800 milliseconds and ends at 01 hours 52 mins 14 seconds. Don't use space - characters. A zero or word 'start' can be used to mark the absolute start of the file and word 'end' the end of the file. Both start and stop times must be defined. Warning while using options -s -sn -sm and -smn: If your cut point is in the middle of a subtitle presentation time (even when muxing subtitles) you may get a video glitch. The mpv video player is very uselful when trying to find in and out points to cut a video. See the chapter below titled The mpv video player
-st Start time. Start video processing from this timecode. Example -st 30:00 starts processing from 30 minutes from the start of the file.
-et End time. Stop video processing at this timecode. Example -et 01:30:00 stops processing at 1 hour 30 minutes. You can define a time range like this: -st 10:09 -et 01:22:49.500 This results in a video file that starts at 10 minutes 9 seconds and stops at 1 hour 22 minutes, 49 seconds and 500 milliseconds.
-d Duration of video to process. Example -d 01:02 process 1 minutes and 2 seconds of the file. Use either -et or -d option not both.
-debug Turn on debug mode and show info about internal variables and the FFmpeg commandlines used.
-mkv Use matroska (mkv) as the output file wrapper format.
-print Print FFmpeg commands that would be used for processing, don't process any files.
**-v ** or -version Show the version of FFcommander.
-td Path to directory for temporary files, example_ -td PathToDir. This option directs temporary files created with 2-pass encoding and subtitle processing (-sp) to a separate directory. Processing with the -sp switch goes much faster when temporary files are created on a ram or ssd - disk. The -sp switch extracts every frame of a movie as a tiff image, so you need to have lots of free space in the temp directory. For a FullHD movie you need 20 GB or more storage for temporary files. Subtitle extraction with the -sp switch fails silently if you run out of storage space. If this happens then some of the last subtitles won't be available when the video is compressed and this results the last available subtitle being 'stuck' on top of video until the end of the movie. This is a limitation in how FFmpeg works and cannot be worked around.
-h or -help Display help text.
The mpv video player is very uselful when trying to find in and out points to cut a video. mpv can be configured to show timecode in 1000th of a second resolution. Put the text: osd-fractions in the file ~/.config/mpv/mpv.conf ). Turn timecode display on or off with the keyboard shortcut ctrl + o Mpv also lets you step forward / back frame by frame while displaying the timecode (, and . keys).
- The command: ffcommander -scan title_t00.mkv prints something like:
ffcommander version 2.38
File name 'title_t00.mkv'
--------------------------------------------------------------------------------------
Video width: 720, height: 576, codec: mpeg2video, color subsampling: yuv420p, color space: unknown, fps: 25.000, average fps: 25.000
Audio stream number: 0, language: eng, for visually impared: 0, number of channels: 2, audio codec: ac3
Subtitle stream number: 0, language: eng, for hearing impared: 0, codec name: dvd_subtitle
Subtitle stream number: 1, language: cze, for hearing impared: 0, codec name: dvd_subtitle
Subtitle stream number: 2, language: dan, for hearing impared: 0, codec name: dvd_subtitle
Subtitle stream number: 3, language: dut, for hearing impared: 0, codec name: dvd_subtitle
Subtitle stream number: 4, language: fin, for hearing impared: 0, codec name: dvd_subtitle
Subtitle stream number: 5, language: nor, for hearing impared: 0, codec name: dvd_subtitle
Subtitle stream number: 6, language: pol, for hearing impared: 0, codec name: dvd_subtitle
Subtitle stream number: 7, language: swe, for hearing impared: 0, codec name: dvd_subtitle
Subtitle stream number: 8, language: eng, for hearing impared: 0, codec name: dvd_subtitle
- Video info shows video resolution, compression codec, frame rate and other information.
- There is only one audio stream in the example and the following info is shown for it:
- Stream number
- Language code
- Whether the subtitle is meant for hearing impaired (0 = false, 1 = true)
- Number of audio channels
- Audio compression codec
- There are nine subtitle streams in this case and the following info is show for each:
- Stream number
- Language code
- Whether the subtitle is meant for hearing impaired (0 = false, 1 = true)
- the codec of the subtitle (dvd in this example).
- Run ffcommander -scan videofiles* to determine which files has the audio and subtitle languages you want. These files can all be processed with the same options in one go.
- Play the file and see if you need / want to remove black borders from the video. Autocrop (-ac) will do this for you.
- Process files: ffcommander -ac -a eng -s eng videofiles* This will process all files beginning with string videofiles. The commands selects the english audio and burns english subtitle on top of the video.
- Lets say a video is 90 minutes and you want to process only the part between 12 mins 14 secs - 25mins 50 secs: ffcommander -st 12:14 -et 25:50 videofile
- DVD, Bluray and DVB (bitmap) subtitle positioning was decided in a time when displays were much smaller than today and could not display 100% of the picture area (tube displays). Because of this subtitles tend to cover too much of the picture area and also be positioned too far from the video edge. In this example we will resize and reposition subtitles to be better compatible with todays big LCD - screens.
- First we need to decide what the optimal size for the subtitle is. Play video with for example the mpv player and display subtitles (keyboard shortcut: j). Locate the sections of the video you want to process and take note of the in and out timestamps (05:10 - 05:40 in the example).
- Process the section of the video: ffcommander -s eng -sp -sr 0.7 -st 05:10 -et 05:40 -f videofile.mkv
- -s eng selects the English subtitle stream.
- -sp checks if the subtitle is above or below the center of the screen and moves the subtitle in the same direction at the edge of the video.
- -sr 0.7 resizes the subtitle to 70% of the original size.
- -st 05:10 start processing at 5min 10 seconds, -et 05:40 end processing at 5 mins 40 secs, -f turns on 1-Pass compression that is twice as fast as 2-pass (but with lower video quality).
- Play the resulting file to see if the subtitle size is right. Adjust the number after -sr until you've found the correct size and then process the whole file: ffcommander -s eng -sp -sr 0.65 videofile.mkv
- Having multiple (bitmap) subtitles in a file lets you select one when you play the video. The example: ffcommander -sm eng,fra,fin videofile muxes English, French and Finnish subtiles into the file.
- This only works with DVD, DVB and Bluray bitmap based subtitles. DVD and DVB subtitles can be muxed into an mp4 - file. Bluray subtitles can only be muxed into an matroska file(-mkv option).
- First get the in- and out timecodes. The mpv video player is very uselful when trying to find in and out points to cut a video. See the chapter above titled The mpv video player
- The example ffcommander -sf 05:44-05:59,08:17-10:22,14:42.380-17:47.590 videofile combines three parts of the video into one:
- 5m 44sec - 5min 59sec
- 8min 17sec - 10min 22sec
- 14min 42sec 380millisec - 17min 47 sec 590 millisec.
- Processing will take some time because first each selected part of the video is recompressed with a lossless codec to a separate file. Then the individual parts are combined into a new file. FFcommander prints out timecode for each point where parts were joined together. Check these for glithces in video playback.
- In this example we select the English audio stream and burn English subtitle on top of the video. The HD and SD versions of the video are created simultaneously
- *ffcommander -a eng -s eng -psd videofile
- The SD - file is placed in directory '00-processed_files/sd'.
- When you process or scan a file FFcommander might print the following message:
Warning: Video frame rate is 29.970. You may need to pullup (Inverse Telecine) this video with option -it
- This means that the video was probably shot using 24 frames / second and was later converted to 29.970 fps to be compatible with NTSC televion refresh rate. The conversion was done duplicating fields every now and then and this process needs to be reversed for the file to play smoothly on modern TV's.
- Use the -it option to remove extra fields and return the video to the original 24 (or 23.976) frame rate: ffcommander -it videofile
- ffcommander -nd -mbr 2500k -aac videofiles This selects 2500 kbps video bitrate.
- ffcommander -crf -aac videofile(s) This uses constant quality 18 for video compression. Constant quality compression is faster than 2-pass but it will create a larger file. In my opinion 2-pass produces slightly better quality that CRF.
- You can do many types of processing at the same time:
- Use English audio (-a eng)
- Burn English subtitle on top of video (-s eng).
- Reposition subtitles at top and bottom edge of screen (-sp)
- Resize subtitle to 50% of the original size (-sr 0.5).
- Remove black bars using autocrop (-ac)
- And create SD - versions of the videos simultaneously with the HD one (-psd).
- ffcommander -a eng -s eng -sp -sr 0.5 -ac -psd videofiles*
- First a simple example: ffcommander -print videofile.mkv
ffcommander version 2.37
################################################################################
Processing file 1/1 'videofile.mkv'
ffmpeg_pass_1_commandline: ffmpeg -y -loglevel level+error -threads 8 -i videofile.mkv -filter_complex '[0:v:0]idet,yadif=0:deint=all[main_processed_video_out]' -map [main_processed_video_out] -sn -c:v libx264 -preset medium -profile:v main -level 4.0 -b:v 1620k -acodec copy -map 0:a:0 -passlogfile 00-processed_files/videofile -f mp4 -pass 1 /dev/null
ffmpeg_pass_2_commandline: ffmpeg -y -loglevel level+error -threads 8 -i videofile.mkv -filter_complex '[0:v:0]idet,yadif=0:deint=all[main_processed_video_out]' -map [main_processed_video_out] -sn -c:v libx264 -preset medium -profile:v main -level 4.0 -b:v 1620k -acodec copy -map 0:a:0 -passlogfile 00-processed_files/videofile -f mp4 -pass 2 00-processed_files/videofile.mp4
- Display FFmpeg commands FFcommander creates for "Complex processing example 1" above: ffcommander -a eng -s eng -sp -sr 0.5 -ac -psd -print videofile-2.mkv
- This displays something like:
ffcommander version 2.38
################################################################################
Processing file 1/1 'videofile-2.mkv'
Finding crop values for: videofile-2.mkv Top: 140 , Bottom: 140 , Left: 0 , Right: 0
FFmpeg Subtitle Extract Commandline: ffmpeg -y -loglevel level+error -threads 16 -i videofile-2.mkv -vn -an -filter_complex [0:s:0]copy[subtitle_processing_stream] -map [subtitle_processing_stream] 00-processed_files/subtitles/videofile-2.mkv-original_subtitles/subtitle-%10d.tiff
ffmpeg_pass_1_commandline: ffmpeg -y -loglevel level+error -threads 16 -i videofile-2.mkv -thread_queue_size 4096 -f image2 -i 00-processed_files/subtitles/videofile-2.mkv-fixed_subtitles/subtitle-%10d.tiff -filter_complex '[1:v:0]copy[subtitle_processing_stream];[0:v:0]idet,yadif=0:deint=all,crop=1920:800:0:140[video_processing_stream];[video_processing_stream][subtitle_processing_stream]overlay=0:main_h-overlay_h+0,split=2[main_processed_video_out][sd_input],[sd_input]scale=1024:-2[sd_scaled_out]' -map [main_processed_video_out] -c:v libx264 -preset medium -profile:v high -level 4.1 -b:v 6000k -acodec copy -map 0:a:0 -passlogfile 00-processed_files/videofile-2 -f mp4 -pass 1 /dev/null -map [sd_scaled_out] -sws_flags lanczos -c:v libx264 -preset medium -profile:v main -level 4.0 -b:v 1620k -acodec copy -map 0:a:0 -passlogfile 00-processed_files/videofile-2-sd -f mp4 -pass 1 /dev/null
ffmpeg_pass_2_commandline: ffmpeg -y -loglevel level+error -threads 16 -i videofile-2.mkv -thread_queue_size 4096 -f image2 -i 00-processed_files/subtitles/videofile-2.mkv-fixed_subtitles/subtitle-%10d.tiff -filter_complex '[1:v:0]copy[subtitle_processing_stream];[0:v:0]idet,yadif=0:deint=all,crop=1920:800:0:140[video_processing_stream];[video_processing_stream][subtitle_processing_stream]overlay=0:main_h-overlay_h+0,split=2[main_processed_video_out][sd_input],[sd_input]scale=1024:-2[sd_scaled_out]' -map [main_processed_video_out] -c:v libx264 -preset medium -profile:v high -level 4.1 -b:v 6000k -acodec copy -map 0:a:0 -passlogfile 00-processed_files/videofile-2 -f mp4 -pass 2 00-processed_files/videofile-2.mp4 -map [sd_scaled_out] -sws_flags lanczos -c:v libx264 -preset medium -profile:v main -level 4.0 -b:v 1620k -acodec copy -map 0:a:0 -passlogfile 00-processed_files/videofile-2-sd -f mp4 -pass 2 00-processed_files/sd/videofile-2.mp4
Sane exit values are still on my to do list.
I grew tired of using Handbrake because of it's limitations and quirks. I've been using FFmpeg in my other projects (FreeLCS) and have become familiar with its immense power. There aren't many things you can't do with it. But the commandline options become very complicated very fast when doing complex things with it.
FFcommander started as a shell script to automate creating these complex commandlines for FFmpeg. After getting tired of Bash's strange syntax I rewrote the program in Go and added features whenever I needed some new type of processing. Now a couple of years later I find that FFcommander is a very capable program and I never need anything else for processing my videos. At this point I think the program is probably useful to other people as well and ready to be published.
FFcommander still is my personal project and I might not accept feature requests for it. Since FFcommander is released under GPL 3 you are welcome to make your own modifications or a fork of it.
There probably are some. If processing stops unexpectedly please first check if FFmpeg is reporting an error. Some FFmpeg errors might not be displayed by default and you might need to run the FFmpeg commands manually to see the messages.
You can do this by using the -print option (see examples above) to print the commands FFcommander creates for FFmpeg. Then remove the string -loglevel level+error from each command and run them manually.
You can report bugs to the projects github page: https://github.com/mhartzel/ffcommander/issues
(C) 2018 Mikael Hartzell, Espoo, Finland.
This program is distributed under the GNU General Public License version 3 (GPLv3)
To find my other work visit: https://github.com/mhartzel There you can find FreeLCS that lets you automatically adjust audio loudness according to EBU R128 and my scripts to setup Vim as my C, C++, Go and Python3 development environment (IDE).