

A free, open-source survey tracker and companion overlay for Project Gorgon. Automatically plots Surveying, Mining, and Geology dots on a transparent map overlay by watching the in-game ChatLogs, optimises your collection route, and removes items from a virtual inventory as you collect them in-game. Supports both normal surveys and motherlode (trilateration) runs.
⬇ Download the latest release —
grab GorgonSurveyTracker.exe and run it. No install, no setup script. Running
from source? See below.
Looking to configure it for the first time? See Setup.
Project Gorgon's Surveying skill generates maps that point you to crystal, metal, and gem nodes but tracking multiple surveys at once, remembering which item is where, and routing efficiently between them is all manual. This tool watches your chat log in real time, places each survey target on a transparent overlay sitting on top of the game's map window, and guides you through collecting them in the shortest path. Works with regular survey maps and motherlode maps.
- Monitors the game's ChatLogs folder for
[Status]distance messages and automatically places survey item dots on the map - First dot requires a manual click to calibrate the pixel-to-meter scale; subsequent dots are placed automatically
- Nearest-neighbour route optimisation with guided step-through
- Detects
"X collected!"messages from the same chat log and removes items from the inventory grid - Two always-on-top transparent overlays — map canvas and inventory grid
- Per-overlay opacity control and click-through toggle
- Drag-to-reposition overlays; window positions and settings persist across sessions
The program relies on chat logs. To enable these, go to the Game Settings, under the GUI category, and make sure you tick 'Enabled' for 'Save Chat Logs' under the Chat Logs section (located at the very bottom). The program will automatically attempt to locate the chat log folder based on it's default location, but should that not work, this section also has an 'Open Folder' button that should show you where they are saved to.
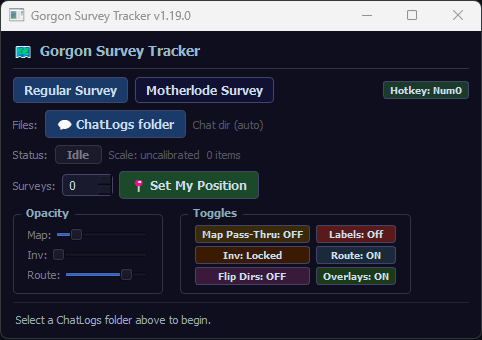
- Open the Control Panel, click 💬 ChatLogs folder, and select your Project Gorgon
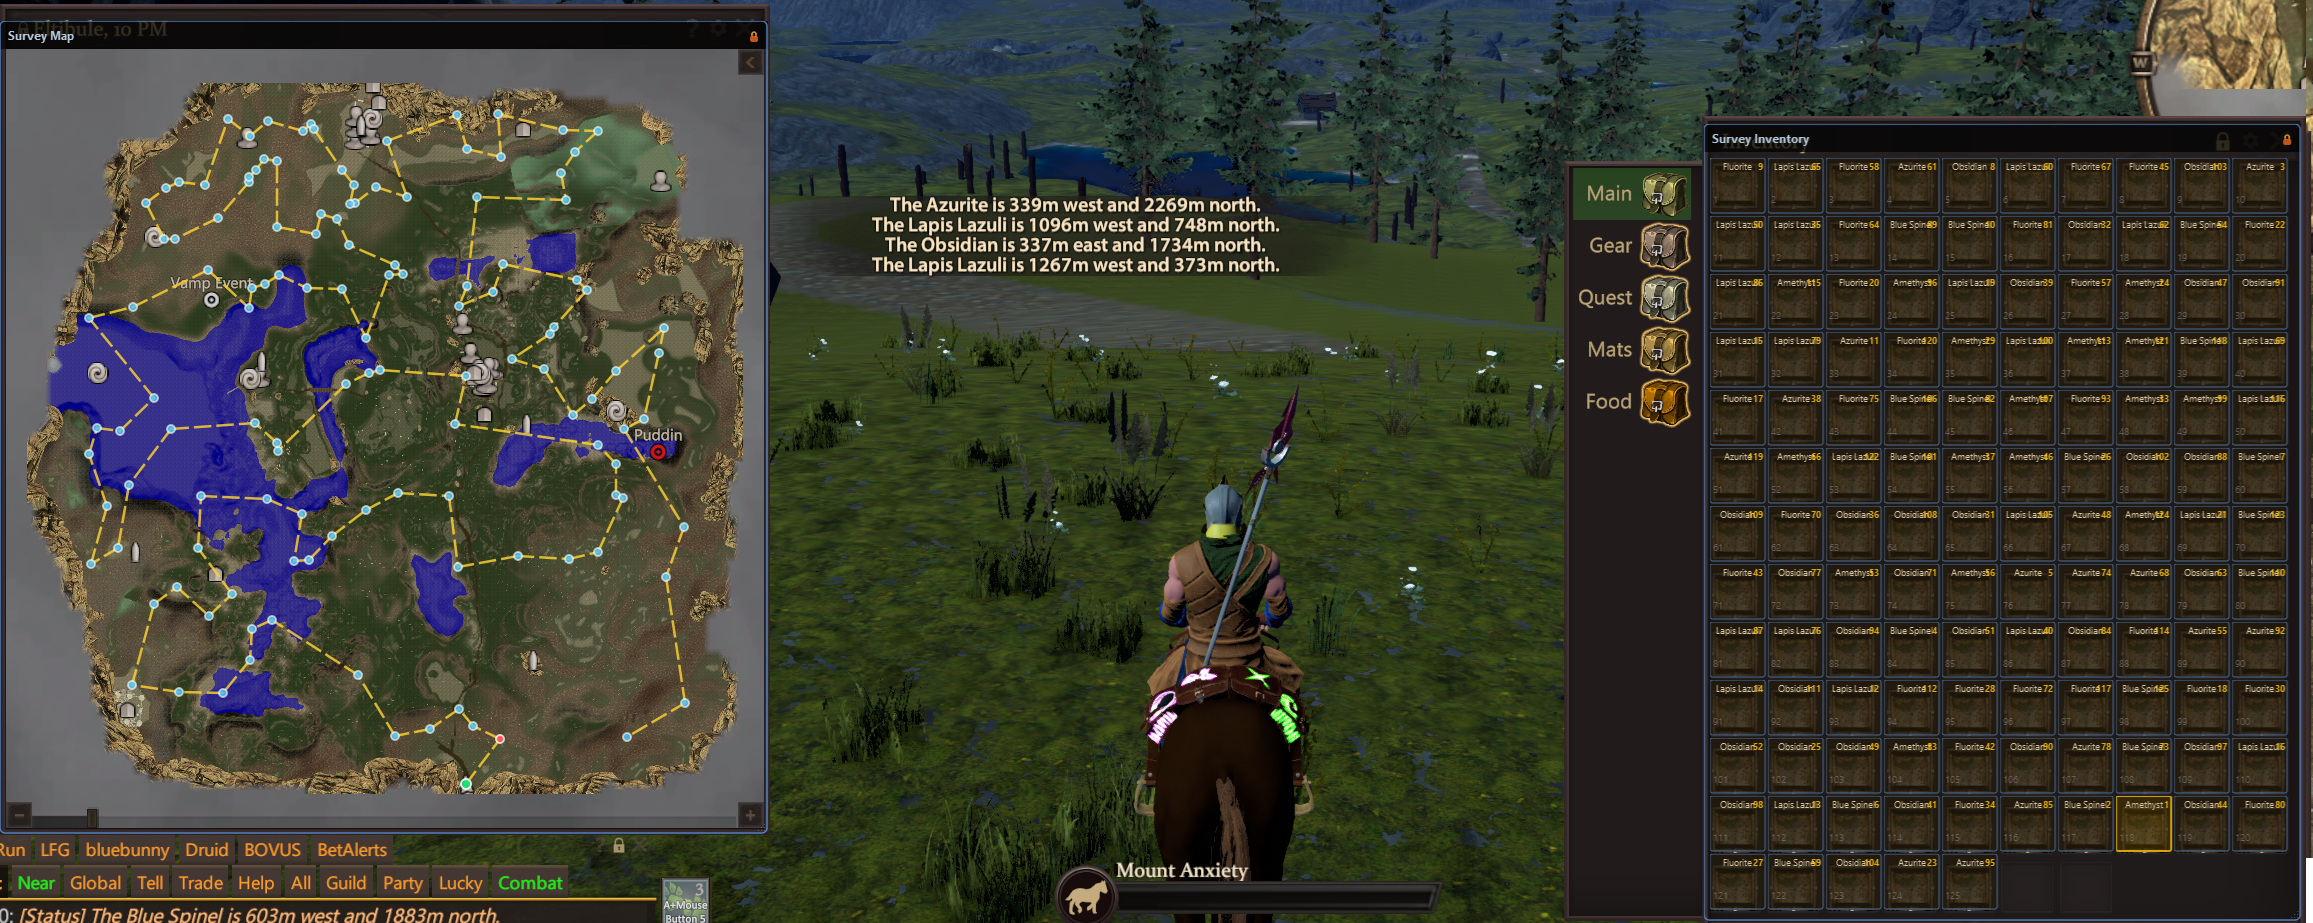
ChatLogsdirectory. The program will attempt to locate the default directory. - Drag the Map and Inventory overlays over you map, and you bags. Both of these should be resizeable windows you can click and drag in the bottom right of their section. The boxes should roughly align with your inventory slots.
- Make sure the Inventory and Map are Locked once you have it in place (Inv: Unlocked/Map Pass-thru buttons on the main window or the Lock Icon) so that you are able to interact with your inventory and the overlay to do the surveys.
- The map overlay can cover your whole map window, not just the actual map inside the window. As long as you are covering the map inside in some way, you should be fine.
- Set your survey count (number of maps you are running). Make sure these start in the top left of your inventory and go without any non survey maps inbetween.
- Click 📍 Set My Position and click your character's position on the map overlay to establish the origin.
- Begin surveying in-game. Each
[Status] The X is Ym DIRchat message places a dot on the overlay. - On the first area, click it on the map to calibrate the scale. Subsequent dots appear automatically, but can be adjusted by clicking the map.
- Since scale is done based on relative distance from your point , you may have to re-calibrate. Further away points help reduce any estimation error and will lead to better auto estimation in subsequent surveys.
- Use 🗺 Optimize Route to step through the nearest-neighbour path to collect each item efficiently. This also starts the session timer for the summary.
- Collect items in-game — they are removed from the inventory grid automatically when the chat log shows
"X collected!". Click → Skip to Next to skip a node if necessary. - Once the final item is collected, a 📊 View Summary button appears next to Reset. Click it to see your session breakdown.
- Profit!
Tip: The inventory grid layout (
cols) can be tweaked by editing thegridsection insurvey_tracker_settings.jsonif you dont want to use 10 columns. The sizing should auto scale as you resize the inventory window to match your screen.
A configurable hotkey (default: Numpad 0) lets you trigger inventory slot clicks without leaving the game window.
| Phase | What the hotkey does |
|---|---|
| Surveying | Double-clicks the next empty slot in the inventory overlay — use it each time you use a survey map in-game to activate it |
| Routing | Double-clicks the currently highlighted (active) slot — use it to collect the item at the active route stop |
If you haven't set a survey count, the hotkey still targets the slot that would come next based on how many items have been found so far.
To change the binding: click the Hotkey: <key> button in the top-right of the control panel (next to the mode buttons), then press any key or key combination (e.g. F5, Ctrl+Num1). The binding is saved to survey_tracker_settings.json and restored on next launch.
Platform support: Requires
pip install pynput>=1.7. Windows also works without pynput via a built-in fallback. On macOS you must grant Accessibility permission when prompted (System Settings → Privacy & Security → Accessibility). On Linux X11 pynput works without any extra setup. Linux Wayland is not supported and the feature is silently disabled.
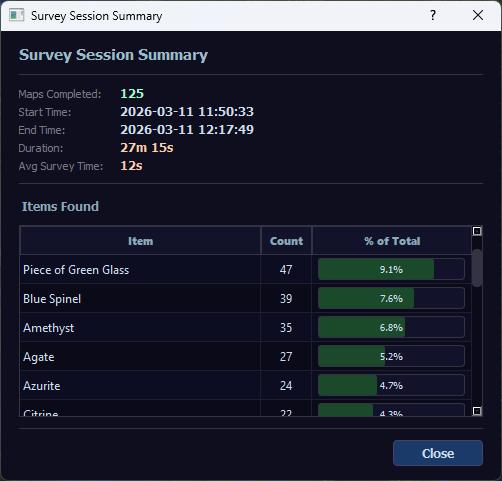
After completing a routing session (all items collected), clicking 📊 View Summary opens a summary window showing:
- Maps Completed — total items collected this session
- Start / End Time and Duration — tracked from when Optimize Route is clicked to the final collection
- Avg Survey Time — average time between consecutive item collections
- XP Gained — Surveying, Mining, Geology, accumulated from chat messages during the session
- Items Found table — every item name with its count and percentage of total, sorted by count descending, with a visual bar for easy comparison
Motherlode surveys give only a raw distance (The treasure is 2733 meters from here) with no bearing. The tracker uses three surveying positions to trilaterate each treasure's location.
- Click Motherlode Survey in the control panel to switch modes. The regular survey controls are replaced with motherlode controls.
- Make sure your ChatLogs folder is set (same as Normal Surveys).
- Click your current position on the map overlay. The status label will confirm Position 1 set.
- In-game, use the survey tool to scan every motherlode in the area. Each
The treasure is X meters from heremessage is recorded automatically — the inventory overlay fills up with slots as distances arrive. - When you have scanned all motherlodes from Position 1, click Next Position in the control panel.
- Walk to a new location (ideally not in a straight line from Position 1), click the map to set Position 2, then scan all motherlodes again and click Next Position.
- Repeat for Position 3.
Important: The three positions you click on the map must be placed with proportionally correct spacing relative to each other. If you walked twice as far between P1→P2 as between P2→P3, the canvas clicks should reflect that ratio. Use in-game landmarks or known distances as a guide.
Tip: Scan motherlodes in the same order each round — the tracker matches distances positionally (first distance = Treasure 1, second = Treasure 2, etc.).
- After round 3, the tracker automatically computes the scale and trilaterated locations. Estimated positions appear as coloured dots on the map overlay, and a dashed route line guides you through them in an optimised order.
- Collect each motherlode in-game. The
X Metal Slab added to inventorymessage triggers automatic progression — the collected slot disappears from the inventory, the player marker moves to that location, and the next target is highlighted. - Click Skip to skip the current target and advance to the next one if needed.
- Click Reset Motherlode to start a fresh survey run.
Tip: The computed pixel/metre scale is shown in the control panel after trilateration. A fit quality warning appears if the estimated circles don't converge well — this usually means the three positions weren't placed proportionally, or you dont have enough samples to computer well.
- Python 3.8+
- PyQt5
- pynput >= 1.7 (optional — enables hotkey on macOS and Linux; Windows has a built-in fallback)
pip install PyQt5 pynput
The overlay runs on macOS and Linux (X11) with some additional optional dependencies for click-through support.
Install PyObjC to enable the click-through toggle on macOS:
pip install pyobjc-framework-Cocoa
Without this, the overlay will display correctly but the click-through toggle will have no effect.
Install python-xlib to enable click-through on X11:
pip install python-xlib
Note: Overlay might have additional issues if running under some sort of Windows emulation
python survey_tracker.py