Tmux configuration, that supercharges your tmux and builds cozy and cool terminal environment.

- Features
- Installation
- General settings
- Key bindings
- Status line
- Nested tmux sessions
- Copy mode
- Clipboard integration
- Themes and customization
- iTerm2 and tmux integration
- support for nested tmux sessions
- local vs remote specific session configuration
- scroll and copy mode improvements
- integration with OSX or Linux clipboard (works for local, remote, and local+remote nested session scenario)
- supercharged status line
- renew tmux and shell environment (SSH_AUTH_SOCK, DISPLAY, SSH_TTY) when reattaching back to old session
- prompt to rename window right after it's created
- newly created windows and panes retain current working directory
- monitor windows for activity/silence
- highlight focused pane
- merge current session with existing one (move all windows)
- configurable visual theme/colors, with some elements borrowed from Powerline
- integration with 3rd party plugins: tmux-sidebar, tmux-copycat, tmux-online-status, and a locally patched, vendored copy of tmux-plugin-sysstat
Status line widgets:
- CPU, memory usage, system load average metrics
- username and hostname, current date time
- visual indicator when you press
prefix - visual indicator when you're in
Copymode - visual indicator when pane is zoomed
- online/offline visual indicator in local sessions
Prerequisites:
- tmux 3.2 or newer is recommended
- Bash
- macOS, Linux, or FreeBSD
To install tmux-config:
$ git clone https://github.com/bnorick/tmux-config.git
$ ./tmux-config/install.sh
install.sh script does following:
- copies files to
~/.tmuxdirectory - symlink tmux config file at
~/.tmux.conf, existing~/.tmux.confwill be backed up - Tmux Plugin Manager will be installed at its default location,
~/.tmux/plugins/tpm, unless already present - plugins declared with
@pluginwill be installed through TPM - the patched sysstat plugin will be copied to
~/.tmux/vendor/tmux-plugin-sysstatand loaded directly, so TPM updates cannot overwrite the local fix
Finally, you can jump into a new tmux session:
$ tmux new
Windows and pane indexing starts from 1 rather than 0. Scrollback history limit is set to 20000. Automatic window renameing is turned off. Aggresive resizing is on. Message line display timeout is 1.5s. Mouse support in on.
256 color palette support is turned on, make sure that your parent terminal is configured propertly. See here and there
# parent terminal
$ echo $TERM
xterm-256color

# jump into a tmux session
$ tmux new
$ echo $TERM
screen-256color
So ~/.tmux.conf overrides default key bindings for many action, to make them more reasonable, easy to recall and comforable to type.
Let's go through them.
If you are an iTerm2 user, third column describes the keybinding of similar "action" in iTerm2. It's possible to reuse very same keys you already get used to and tell iTerm2 to execute analogous tmux actions. See iTerm2 and tmux integration section below.
| tmux key | Description | iTerm2 key |
<prefix> C-e |
Open ~/.tmux.conf file in your $EDITOR | - |
<prefix> M-C-e |
Reload tmux configuration from ~/.tmux.conf file | - |
<prefix> r |
Rename current window | - |
<prefix> R |
Rename current session | - |
<prefix> _ |
Split new pane horizontally | ⌘⇧D |
<prefix> | |
Split new pane vertically | ⌘D |
<prefix> < |
Select next pane | ⌘[ |
<prefix> > |
Select previous pane | ⌘] |
<prefix> ← |
Select pane on the left | ⌘⌥← |
<prefix> → |
Select pane on the right | ⌘⌥→ |
<prefix> ↑ |
Select pane on the top | ⌘⌥↑ |
<prefix> ↓ |
Select pane on the bottom | ⌘⌥↓ |
<prefix> C-← |
Resize pane to the left | ^⌘← |
<prefix> C-→ |
Resize pane to the right | ^⌘→ |
<prefix> C-↑ |
Resize pane to the top | ^⌘↑ |
<prefix> C-↓ |
Resize pane to the bottom | ^⌘↓ |
S-right |
Move to next window | ⌘⇧] |
S-left |
Move to previous window | ⌘⇧[ |
C-S-right |
Swap with next window | ⌘[ |
C-S-left |
Swap with previous window | ⌘] |
C-t |
Create a new window | |
<prefix> Tab |
Switch to most recently used window | ^Tab |
<prefix> L |
Link window from another session by entering target session and window reference | - |
<prefix> \ |
Swap panes back and forth with 1st pane. When in main-horizontal or main-vertical layout, the main panel is always at index 1. This keybinding let you swap secondary pane with main one, and do the opposite. | ⌘\ |
<prefix> C-o |
Swap current active pane with next one | - |
<prefix> + |
Toggle zoom for current pane | ⌘⇧Enter |
<prefix> x |
Kill current pane | ⌘W |
<prefix> X |
Kill current window | ⌘⌥W |
<prefix> C-x |
Kill other windows but current one (with confirmation) | - |
<prefix> Q |
Kill current session (with confirmation) | - |
<prefix> C-u |
Merge current session with another. Essentially, this moves all windows from current session to another one | - |
C-up |
Show sessions | |
<prefix> d |
Detach from session | - |
<prefix> D |
Detach other clients except current one from session | - |
<prefix> C-s |
Toggle status bar visibility | - |
<prefix> m |
Monitor current window for activity | - |
<prefix> M |
Monitor current window for silence by entering silence period | - |
S-Down / S-Up |
Switch off/on key bindings and prefix handling for nested sessions. See "Nested sessions" for more information | - |
I've started with Powerline as a status line, but then realized it's too fat for my Macbook 15'' display, it hardly can fit all those fancy arrows, widgets and separators, so that I can only see one window "tab".
So I decided to keep it dense and include only essential widgets.
Left part:

Right part:

The left part contains only current session name.
Window tabs use Powerline arrows glyphs, so you need to install Powerline enabled font to make this work. See Powerline docs for instructions and here is the collection of patched fonts for powerline users
The right part of status line consists of following components:
- CPU, memory usage, and system load average metrics. These are powered by a vendored copy of tmux-plugin-sysstat, patched to use the lightweight
vmstatcollector when available instead of repeatedly enumerating every process withtop. - username and hostname (invaluable when you SSH onto remote host)
- current date time
- visual indicator when you press the prefix key
- visual indicator when pane is zoomed:
[Z] - online/offline visual indicator in local sessions (pings
www.google.comby default)
The status bar refreshes every five seconds. The vendored sysstat provenance and local changes are recorded in VENDORED.md.
One prefers using tmux on local machine to supercharge their terminal emulator experience, other use it only for remote scenarios to retain session/state in case of disconnect. Things are getting more complex, when you want to be on both sides. You end up with nested session, and face the question: How you can control inner session, since all keybindings are caught and handled by outer session?. Community provides several possible solutions.
The most common approach is to press the prefix twice (C-b C-b with this configuration). The first is caught by the local session and the second is passed to the remote one. However, root key-table bindings are still handled by the outer session and cannot be passed to the inner one.
Second attempt to tackle this issue, is to setup 2 individual prefixes, C-b for local session, and C-a for remote session. And, you know, it feels like:

And finally accepted solution, turn off all keybindings and key prefix handling in outer session, when working with inner one. This way, outer session just sits aside, without interfering keystrokes passed to inner session. Credits to http://stahlke.org/dan/tmux-nested/ and this Github issue
With this configuration, press Shift-Down in the outer session to disable its key bindings and prefix handling. You can then control the inner session with the normal bindings and prefix. While the outer session is disabled, additional Shift-Down presses are consumed by the outer session so they cannot accidentally disable the inner session too. Press Shift-Up to enable the outer session again.

You might notice that when key bindings are "OFF", special [OFF] visual indicator is shown in the status line, and status line changes its style (colored to gray).
Remote session is detected by existence of $SSH_CLIENT variable. When session is remote, following changes are applied:
- status line is docked to bottom; so it does not stack with status line of local session
- date/time and online-status widgets are removed to save width, while CPU, memory, and load metrics remain visible
You can apply remote-specific settings by extending ~/.tmux/.tmux.remote.conf file.
There are some tweaks to copy mode and scrolling behavior, you should be aware of.
There is a root keybinding to enter Copy mode: M-Up. Once in copy mode, you have several scroll controls:
- scroll by line:
M-Up,M-down - scroll by half screen:
M-PageUp,M-PageDown - scroll by whole screen:
PageUp,PageDown - scroll by mouse wheel, scroll step is changed from
5lines to2
Space starts selection, Enter copies selection and exits copy mode. List all items in copy buffer using prefix C-p, and paste most recent item from buffer using prexix p.
Press prefix y outside copy mode to copy the current pane's entire retained history, including its visible contents, directly to the local clipboard.
y just copies selected text and is equivalent to Enter, Y copies whole line, and D copies by the end of line.
Also, note, that when text is copied any trailing new lines are stripped. So, when you paste buffer in a command prompt, it will not be immediately executed.
You can also select text using mouse. Default behavior is to copy text and immediately cancel copy mode on MouseDragEnd event. This is annoying, because sometimes I select text just to highlight it, but tmux drops me out of copy mode and reset scroll by the end. I've changed this behavior, so MouseDragEnd does not execute copy-selection-and-cancel action. Text is copied, but copy mode is not cancelled and selection is not cleared. You can then reset selection by mouse click.

When you copy text inside tmux, it's stored in private tmux buffer, and not shared with system clipboard. Same is true when you SSH onto remote machine, and attach to tmux session there. Copied text will be stored in remote's session buffer, and not shared/transported to your local system clipboard. And sure, if you start local tmux session, then jump into nested remote session, copied text will not land in your system clipboard either.
This is one of the major limitations of tmux, that you might just decide to give up using it. Let's explore possible solutions:
- share text with OSX clipboard using "pbcopy"
- share text with OSX clipboard using reattach-to-user-namespace wrapper to access "pbcopy" from tmux environment (seems on OSX 10.11.5 ElCapitan this is not needed, since I can still access pbcopy without this wrapper).
- share text with X selection using "xclip" or "xsel" (store text in primary and clipboard selections). Works on Linux when DISPLAY variable is set.
All solutions above are suitable for sharing tmux buffer with system clipboard for local machine scenario. They still does not address remote session scenarios. What we need is some way to transport buffer from remote machine to the clipboard on the local machine, bypassing remote system clipboard.
There are 2 workarounds to address remote scenarios.
Use ANSI OSC 52 escape sequences to talk to the controlling terminal and place the buffer on the local machine's clipboard. The terminal must support OSC 52 and allow applications to write to the clipboard; support and permission settings vary by terminal.
Every configured copy binding captures the initiating tmux client's #{client_tty} and passes it to the clipboard script. This is important when a session has multiple attached clients: SSH_TTY values stored in a pane or session environment may point to an older or different SSH connection.
Second workaround is really involved and consists of local network listener and SSH remote tunneling:
- SSH onto target machine with remote tunneling on
ssh -R 11988:localhost:3333 alexeys@192.168.33.100 - When text is copied inside tmux (by mouse, by keyboard by whatever configured shortcut), pipe text to network socket on remote machine
echo "buffer" | nc localhost 11988 - Buffer will be sent through the SSH reverse tunnel from port
11988on the remote machine to port3333on the local machine. The remote port matches@copy_backend_remote_tunnel_portintmux.remote.conf. - Setup a service on local machine (systemd service unit with socket activation), which listens on network socket on port
3333, and pipes any input topbcopycommand (orxsel,xclip).
This tmux-config does its best to integrate with system clipboard, trying all solutions above in order, and falling back to OSC 52 ANSI escape sequences in case of failure.
On macOS, pbcopy is used when available. Older systems may require the reattach-to-user-namespace wrapper. When relying on OSC 52, make sure the terminal permits applications to access the clipboard.
On Linux, install xclip or xsel for local graphical sessions. Remote sessions need either OSC 52 support or the optional listener and SSH reverse tunnel described above.
All colors related to theme are declared as variables. You can change them in ~/.tmux.conf.
# This is a theme CONTRACT, you are required to define variables below
# Change values, but not remove/rename variables itself
color_dark="$color_black"
color_light="$color_white"
color_session_text="$color_blue"
color_status_text="colour245"
color_main="$color_orange"
color_secondary="$color_purple"
color_level_ok="$color_green"
color_level_warn="$color_yellow"
color_level_stress="$color_red"
color_window_off_indicator="colour088"
color_window_off_status_bg="colour238"
color_window_off_status_current_bg="colour254"
Note, that variables are not extracted to dedicated file, as it should be, because for some reasons, tmux does not see variable values after sourcing theme.conf file. Don't know why.
If you're an iTerm user, you may already have muscle memory for common actions such as splitting panes, changing focus, zooming a pane, or creating a window. iTerm2 can send the tmux key sequences for those actions directly.
You can setup new profile in iTerm preferences to override default keybindings, to tell iTerm to send pre-configured sequences of keys, that will trigger corresponding action in tmux.

For example, an iTerm2 shortcut can send the bytes 0x02 0x2b, which tmux interprets as C-b + and uses to toggle pane zoom with this configuration.
You can get binary representation of any keys, using showkey or od commands
$od -t x1

^B+          // press C-b + on your keyboard
0000000 02 2b
0000002
$ showkey -a
Press any keys - Ctrl-D will terminate this program

^B        2 0002 0x02
+        43 0053 0x2b
You can remap whatever key in this way, but I do this only for those ones, which have similar analogous action in tmux and are most common(resize pane, zoom pane, create new window, etc). See table with keybindings above.
As additional step, you can setup this new iTerm profile as default one, and tell it to jump into tmux session right off the start.
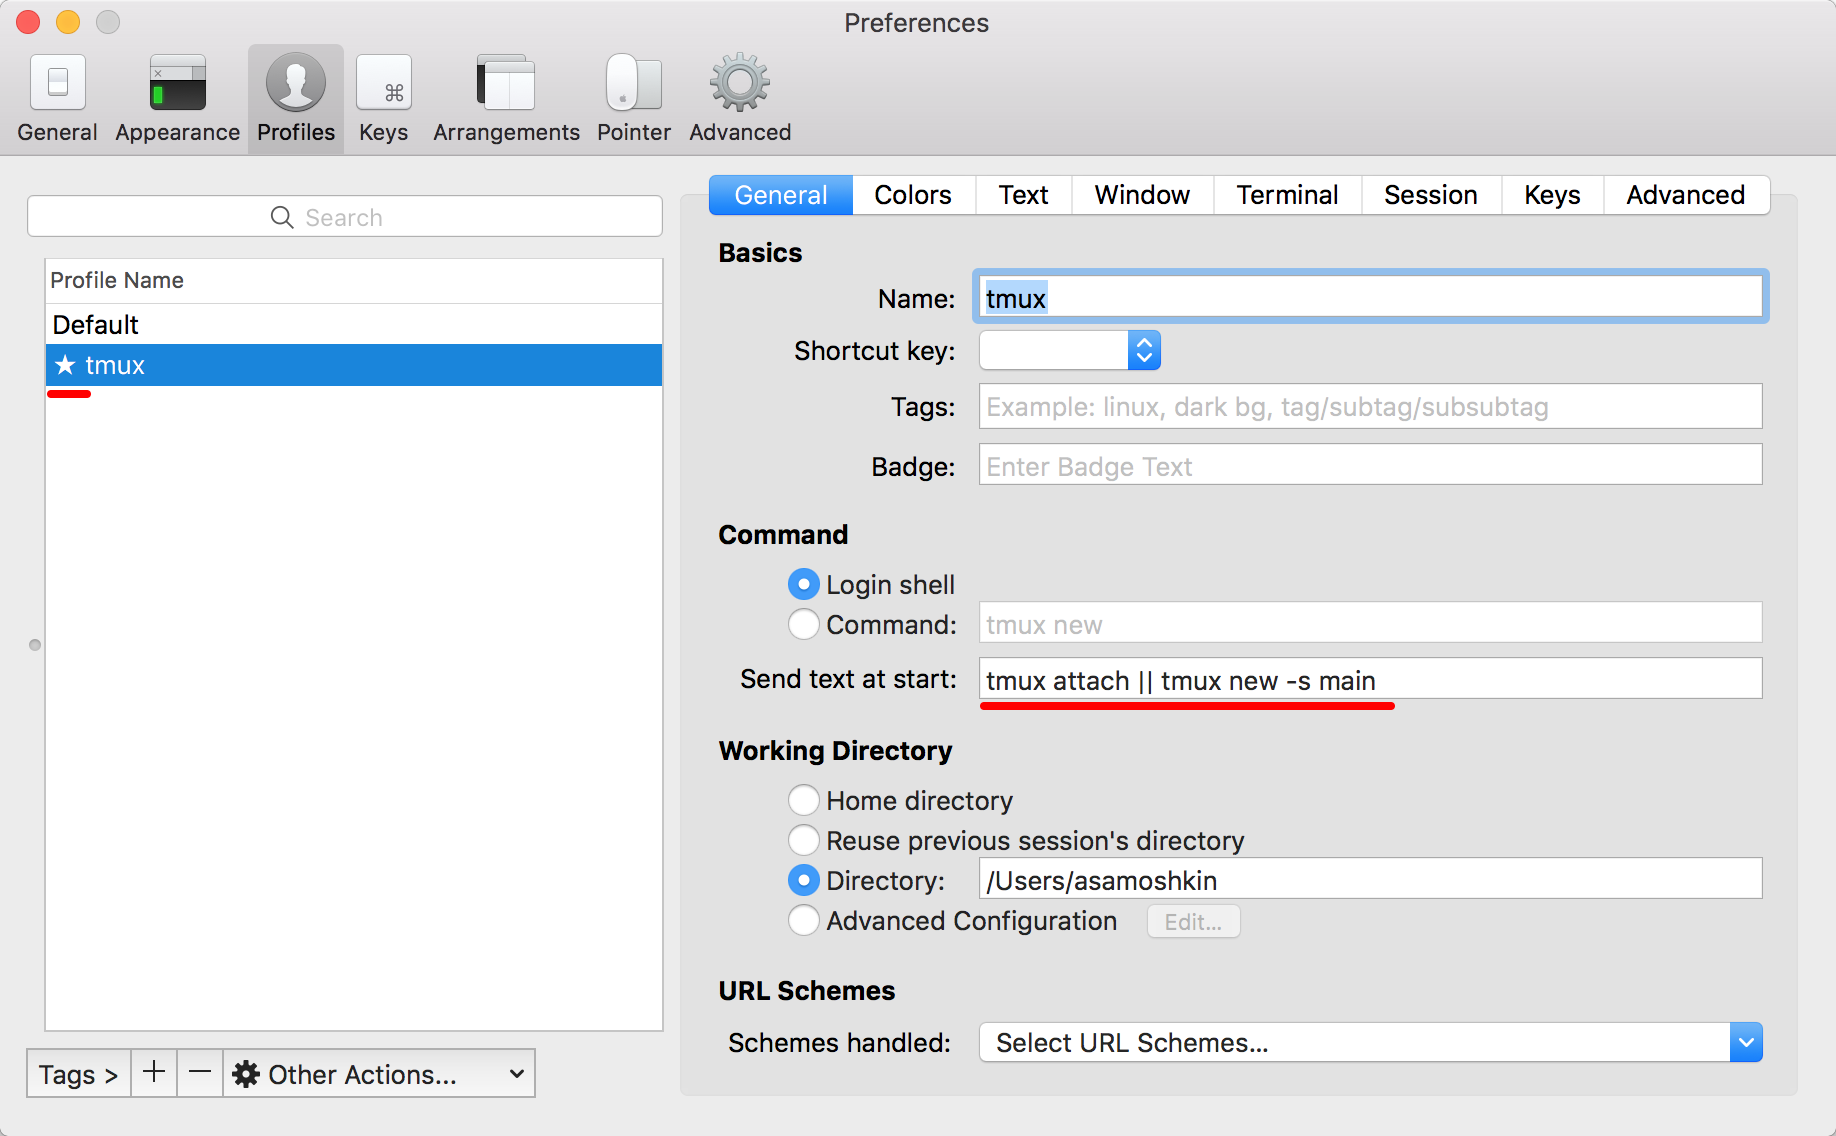
You can then go full screen in iTerm, so iTerm tabs and frame do not distract you (anyway now you're using iTerm just as a tunnel to your tmux, everything else happens inside tmux).
