Runze Zhang(rz387) Hongjiao Zhang(hz452) Jiaqi Liu (jl3442)
- Pull the new changes from the class interactive-lab-hub. (You should be familiar with this already!)
- Install MQTT Explorer on your laptop. If you are using Mac, MQTT Explorer only works when installed from the App Store.
- Readings before class:
The point of this lab is to introduce you to distributed interaction. We have included some Natural Language Processing (NLP) and Generation (NLG) but those are not really the emphasis. Feel free to dig into the examples and play around the code which you can integrate into your projects if wanted. However, we want to emphasize that the grading will focus on your ability to develop interesting uses for messaging across distributed devices. Here are the four sections of the lab activity:
A) MQTT
B) Send and Receive on your Pi
MQTT is a lightweight messaging portal invented in 1999 for low bandwidth networks. It was later adopted as a defacto standard for a variety of Internet of Things (IoT) devices.
- Broker - The central server node that receives all messages and sends them out to the interested clients. Our broker is hosted on the far lab server (Thanks David!) at
farlab.infosci.cornell.edu/8883. Imagine that the Broker is the messaging center! - Client - A device that subscribes or publishes information to/on the network.
- Topic - The location data gets published to. These are hierarchical with subtopics. For example, If you were making a network of IoT smart bulbs this might look like
home/livingroom/sidelamp/light_statusandhome/livingroom/sidelamp/voltage. With this setup, the info/updates of the sidelamp'slight_statusandvoltagewill be store in the subtopics. Because we use this broker for a variety of projects you have access to read, write and create subtopics ofIDD. This meansIDD/ilan/is/a/goofis a valid topic you can send data messages to. - Subscribe - This is a way of telling the client to pay attention to messages the broker sends out on the topic. You can subscribe to a specific topic or subtopics. You can also unsubscribe. Following the previouse example of home IoT smart bulbs, subscribing to
home/livingroom/sidelamp/#would give you message updates to both the light_status and the voltage. - Publish - This is a way of sending messages to a topic. Again, with the previouse example, you can set up your IoT smart bulbs to publish info/updates to the topic or subtopic. Also, note that you can publish to topics you do not subscribe to.
Important note: With the broker we set up for the class, you are limited to subtopics of IDD. That is, to publish or subcribe, the topics will start with IDD/. Also, setting up a broker is not much work, but for the purposes of this class, you should all use the broker we have set up for you!
Debugging and visualizing what's happening on your MQTT broker can be helpful. We like MQTT Explorer. You can connect by putting in the settings from the image below.

Once connected, you should be able to see all the messages under the IDD topic. , go to the Publish tab and try publish something! From the interface you can send and plot messages as well. Remember, you are limited to subtopics of IDD. That is, to publish or subcribe, the topics will start with IDD/.

sender.py and and reader.py show you the basics of using the mqtt in python. Let's spend a few minutes running these and seeing how messages are transferred and shown up. Before working on your Pi, keep the connection of farlab.infosci.cornell.edu/8883 with MQTT Explorer running on your laptop.
Running Examples on Pi
-
Install the packages from
requirements.txtunder a virtual environment, we will continue to use thecircuitpythonenvironment we setup earlier this semester:pi@raspberrypi:~/Interactive-Lab-Hub $ source circuitpython/bin/activate (circuitpython) pi@raspberrypi:~/Interactive-Lab-Hub $ cd Lab\ 6 (circuitpython) pi@raspberrypi:~/Interactive-Lab-Hub/Lab 6 $ pip install -r requirements.txt ... -
Run
sender.py, fill in a topic name (should start withIDD/), then start sending messages. You should be able to see them on MQTT Explorer.(circuitpython) pi@raspberrypi:~/Interactive-Lab-Hub/Lab 6 $ python sender.py >> topic: IDD/AlexandraTesting now writing to topic IDD/AlexandraTesting type new-topic to swich topics >> message: testtesttest ... -
Run
reader.py, and you should see any messages being published toIDD/subtopics. Type a message inside MQTT explorer and see if you can receive it withreader.py.(circuitpython) pi@raspberrypi:~ Interactive-Lab-Hub/Lab 6 $ python reader.py ...

***Consider how you might use this messaging system on interactive devices, and draw/write down 5 ideas here.***
These are the idea we think of:
-
Monitor computer screen color with color sensor to change ambient lighting.
-
Monitor the ambient light level with a light sensor to change the computer screen brightness.
-
Put an accelerometer on your arm to monitor arm movement to play somatosensory games.
-
Monitor speaker gestures with gesture sensors to switch slides.
-
Use the distance sensor to monitor the distance between the person watching the TV and the TV, so as to avoid people watching too close to the TV and hurting the eyes (especially for children).
We have included an updated example from lab 4 that streams the capacitor sensor inputs over MQTT. We will also be running this example under circuitpython virtual environment.
Plug in the capacitive sensor board with the Qwiic connector. Use the alligator clips to connect a Twizzler (or any other things you used back in Lab 4) and run the example script:


(circuitpython) pi@raspberrypi:~ Interactive-Lab-Hub/Lab 6 $ python distributed_twizzlers_sender.py
...
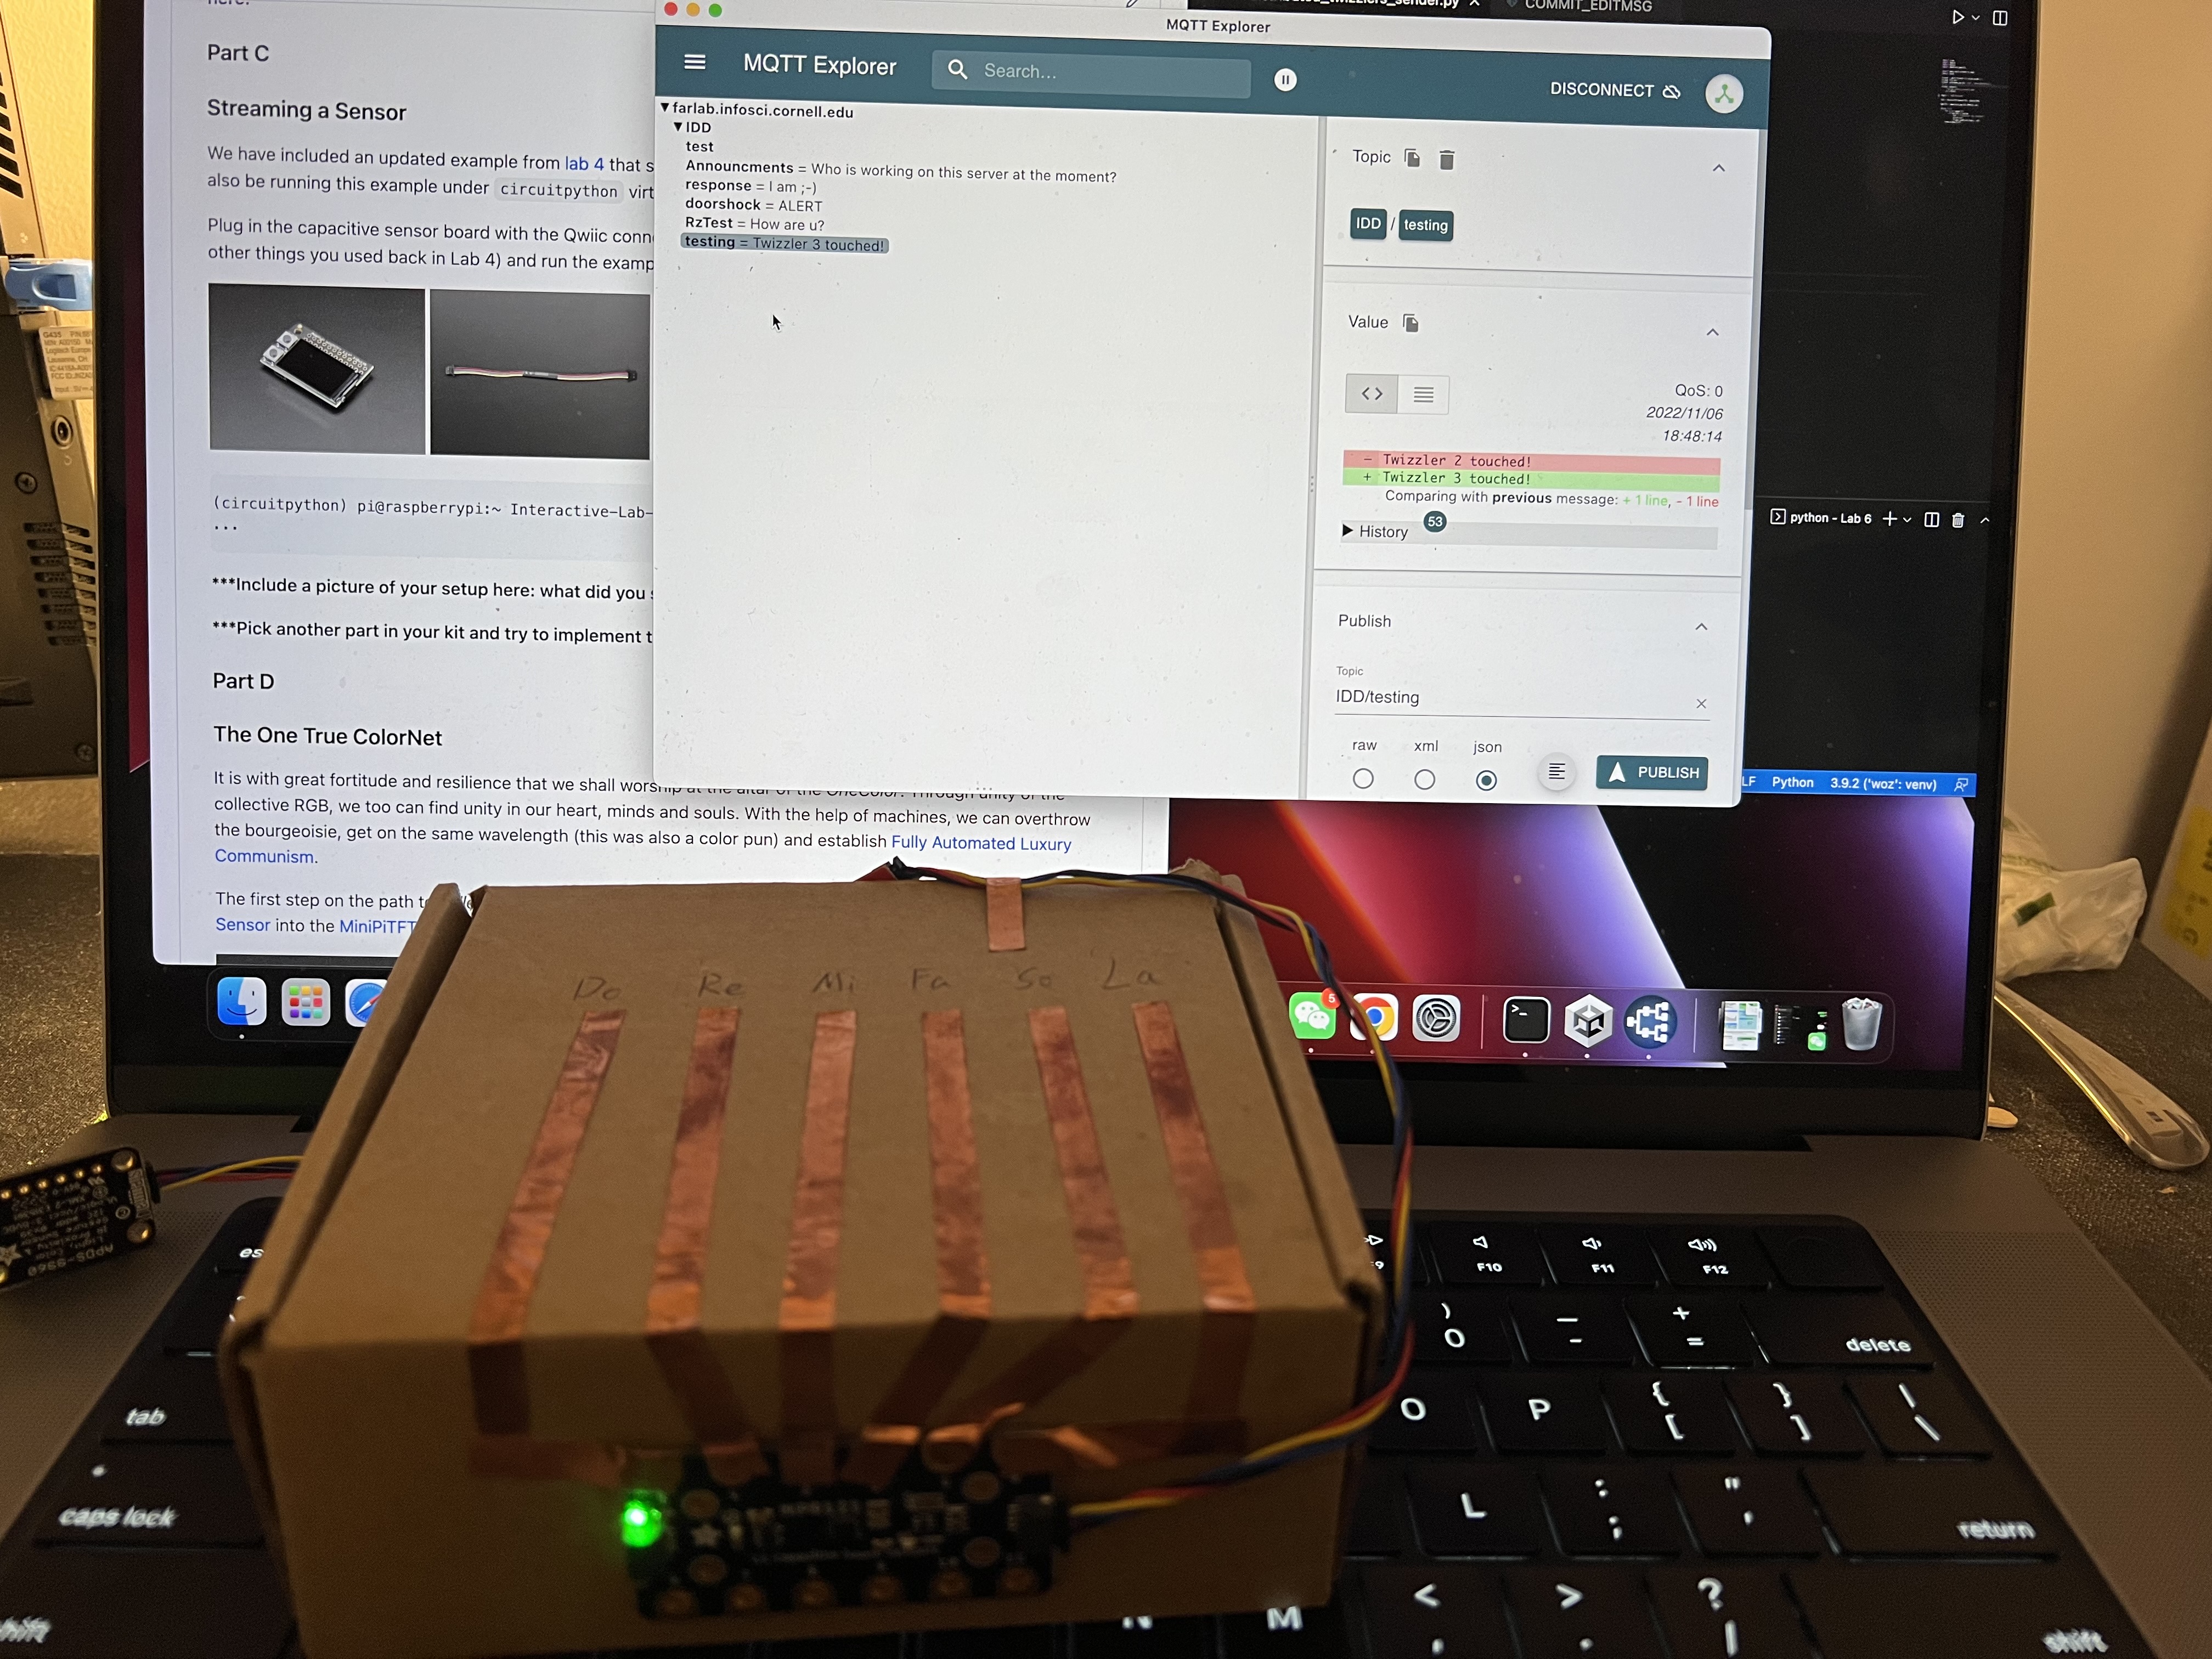
***Include a picture of your setup here: what did you see on MQTT Explorer?***
This is our setup picture:
***Pick another part in your kit and try to implement the data streaming with it.***
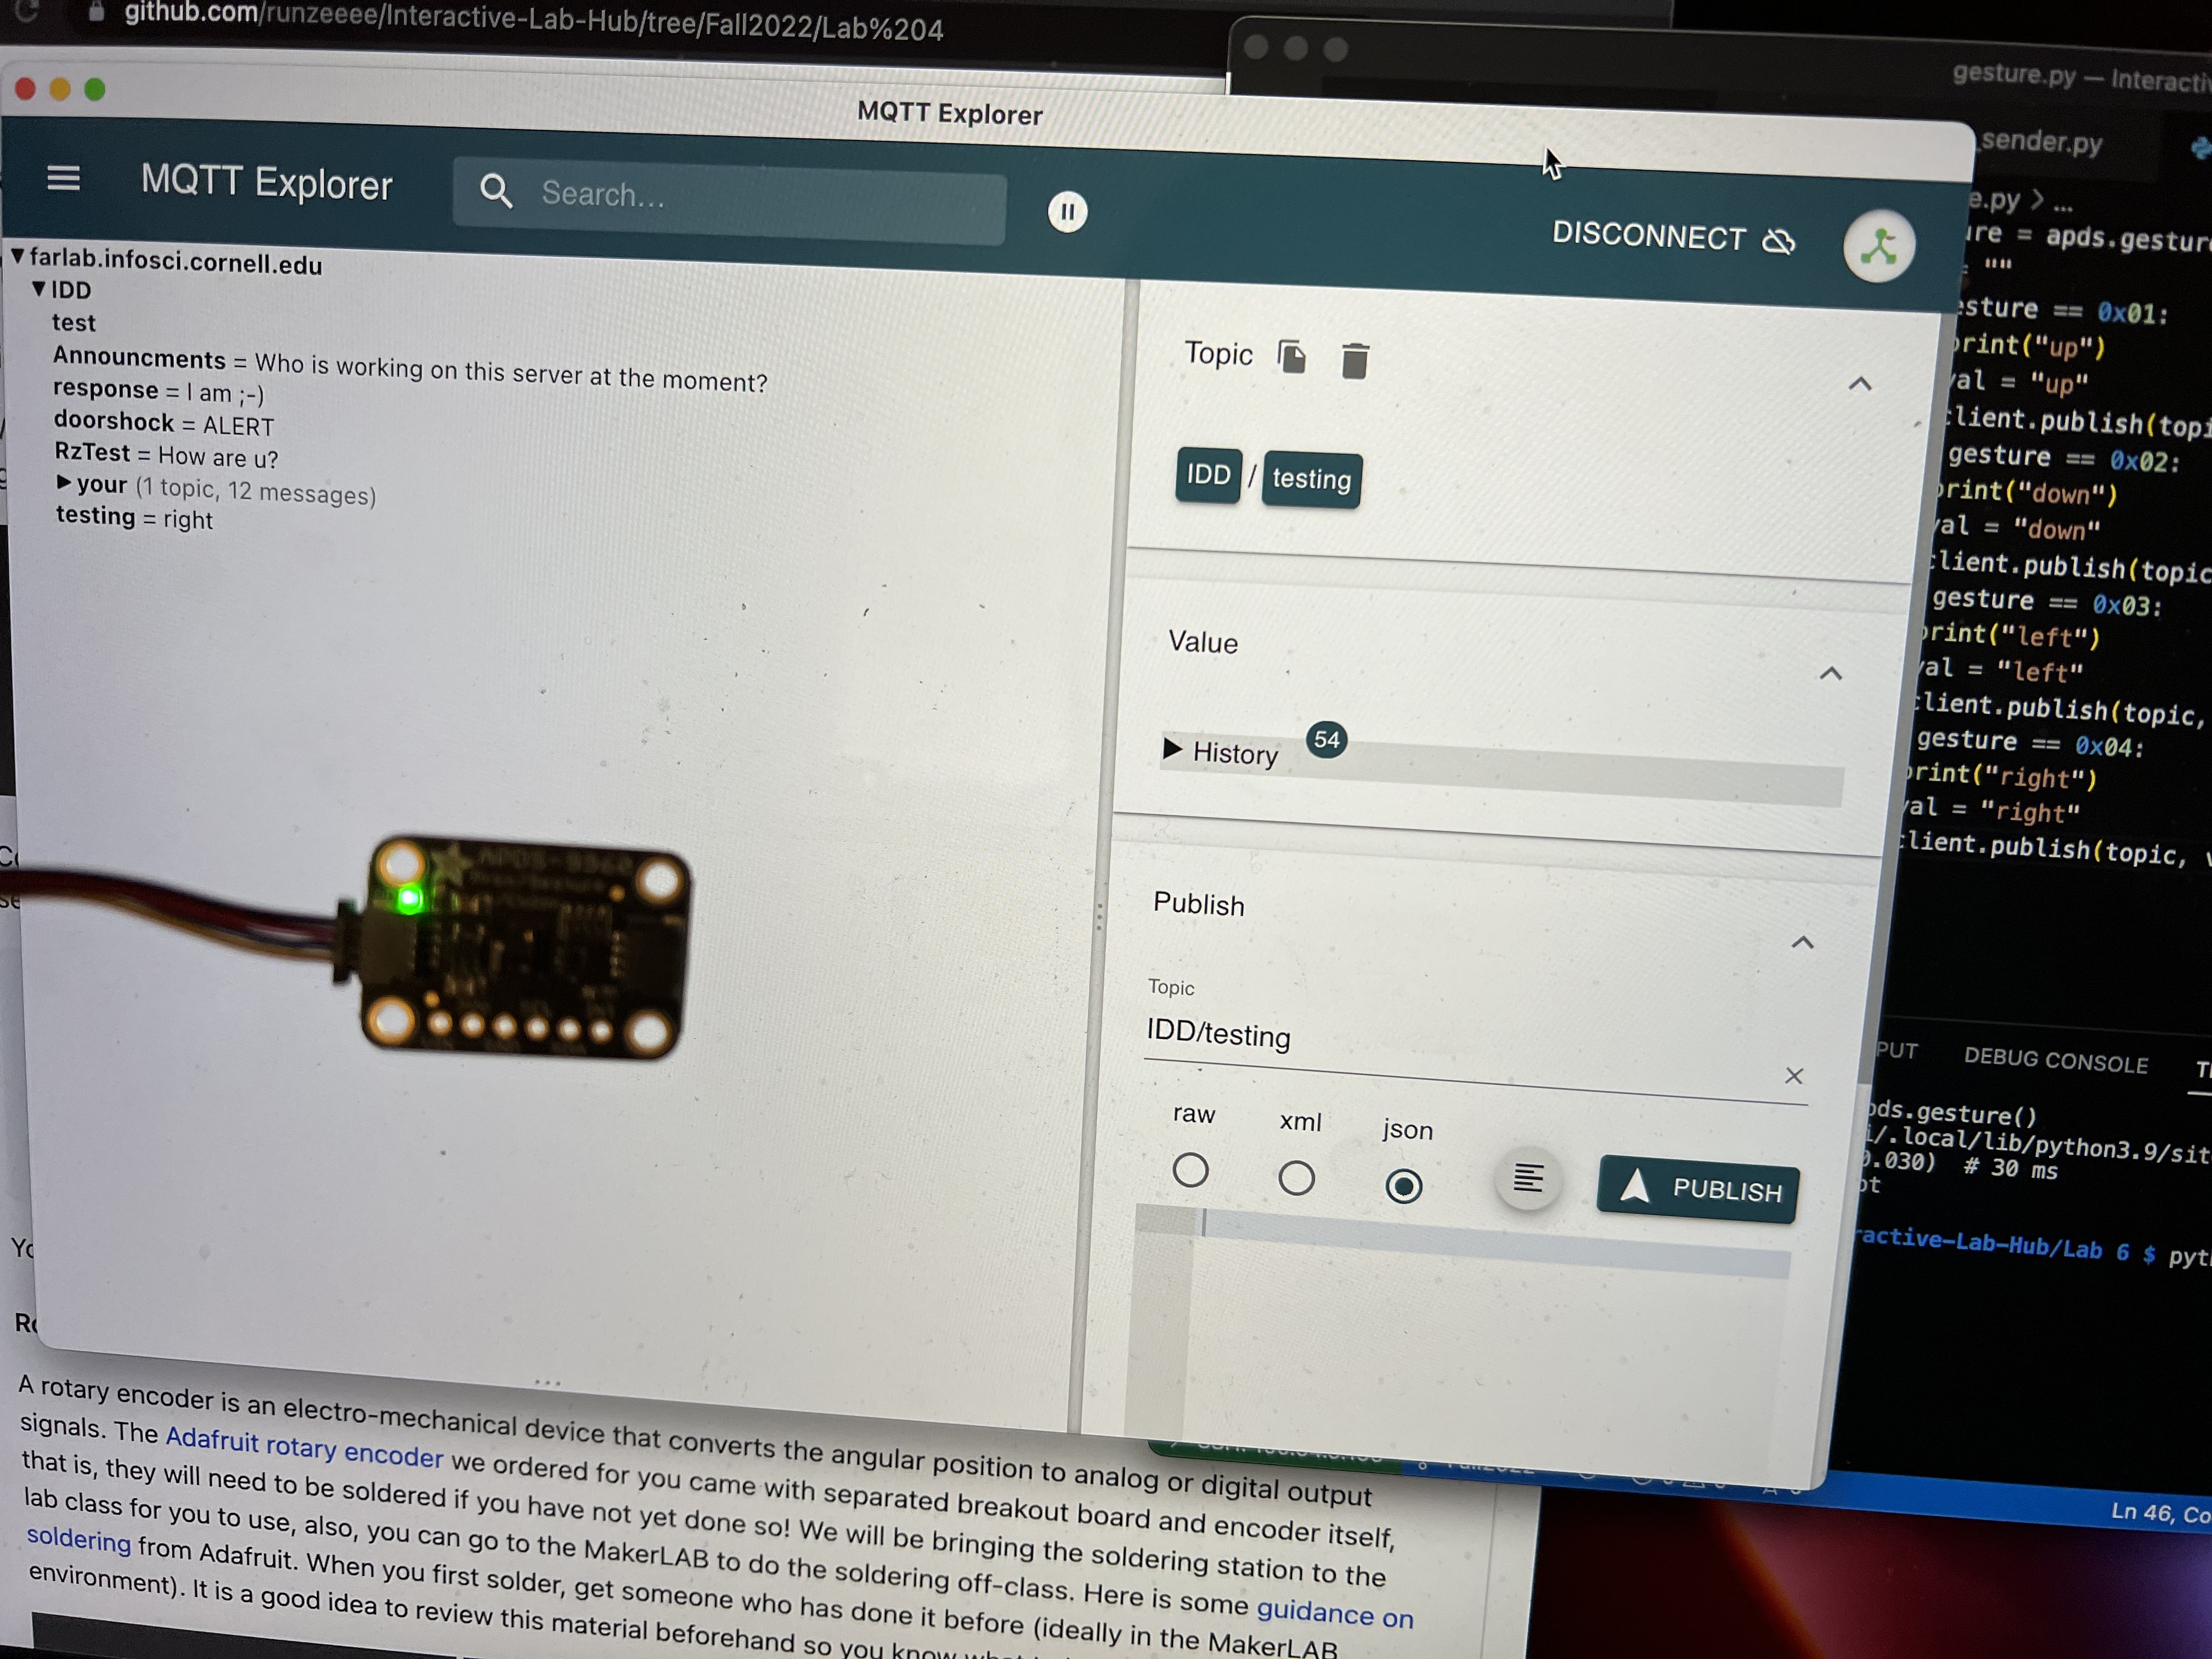
We picked APDS9960 Gesture Sensor
It is with great fortitude and resilience that we shall worship at the altar of the OneColor. Through unity of the collective RGB, we too can find unity in our heart, minds and souls. With the help of machines, we can overthrow the bourgeoisie, get on the same wavelength (this was also a color pun) and establish Fully Automated Luxury Communism.
The first step on the path to collective enlightenment, plug the APDS-9960 Proximity, Light, RGB, and Gesture Sensor into the MiniPiTFT Display. You are almost there!

The second step to achieving our great enlightenment is to run color.py. We have talked about this sensor back in Lab 2 and Lab 4, this script is similar to what you have done before! Remember to activate the circuitpython virtual environment you have been using during this semester before running the script:
(circuitpython) pi@raspberrypi:~ Interactive-Lab-Hub/Lab 6 $ python color.py
...
By running the script, wou will find the two squares on the display. Half is showing an approximation of the output from the color sensor. The other half is up to the collective. Press the top button to share your color with the class. Your color is now our color, our color is now your color. We are one.
(A message from the previous TA, Ilan: I was not super careful with handling the loop so you may need to press more than once if the timing isn't quite right. Also, I haven't load-tested it so things might just immediately break when everyone pushes the button at once.)
You may ask "but what if I missed class?" Am I not admitted into the collective enlightenment of the OneColor?
Of course not! You can go to https://one-true-colornet.glitch.me/ and become one with the ColorNet on the inter-webs. Glitch is a great tool for prototyping sites, interfaces and web-apps that's worth taking some time to get familiar with if you have a chance. Its not super pertinent for the class but good to know either way.
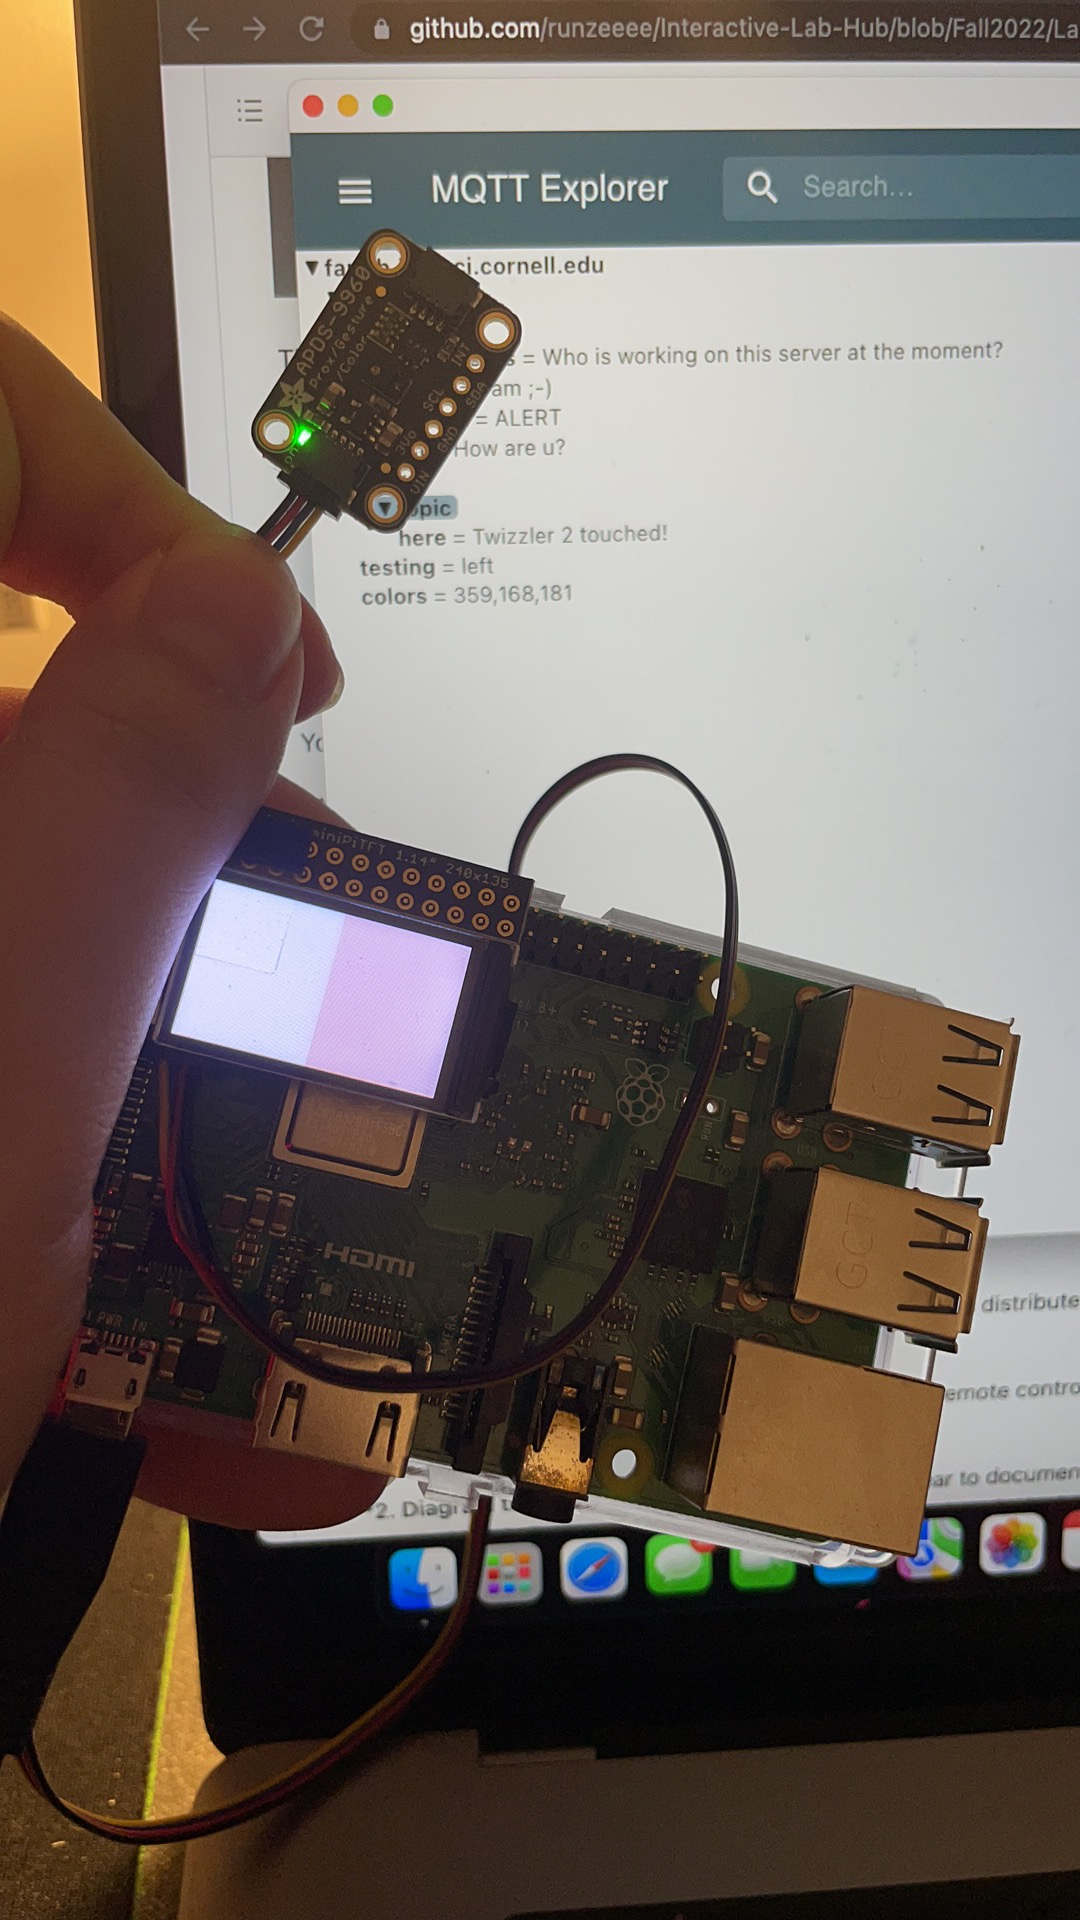
***Can you set up the script that can read the color anyone else publish and display it on your screen?***
Yes we can. Here is the screenshot.
Find at least one class (more are okay) partner, and design a distributed application together based on the exercise we asked you to do in this lab.
***1. Explain your design*** For example, if you made a remote controlled banana piano, explain why anyone would want such a thing.
Our design is gesture remote control to switch next slide and previous slide of a powerpoint slides. We think it is very necessary and cool to implement this short design because sometimes a remote control device might be out of battery or too long of a distance or might just be the presenter forgets to bring a remote control. That way it would be very difficult to move on with their presentations. With our design, we can remotely control the presentation moving forward and backward with simple gestures to make people lives much easier.
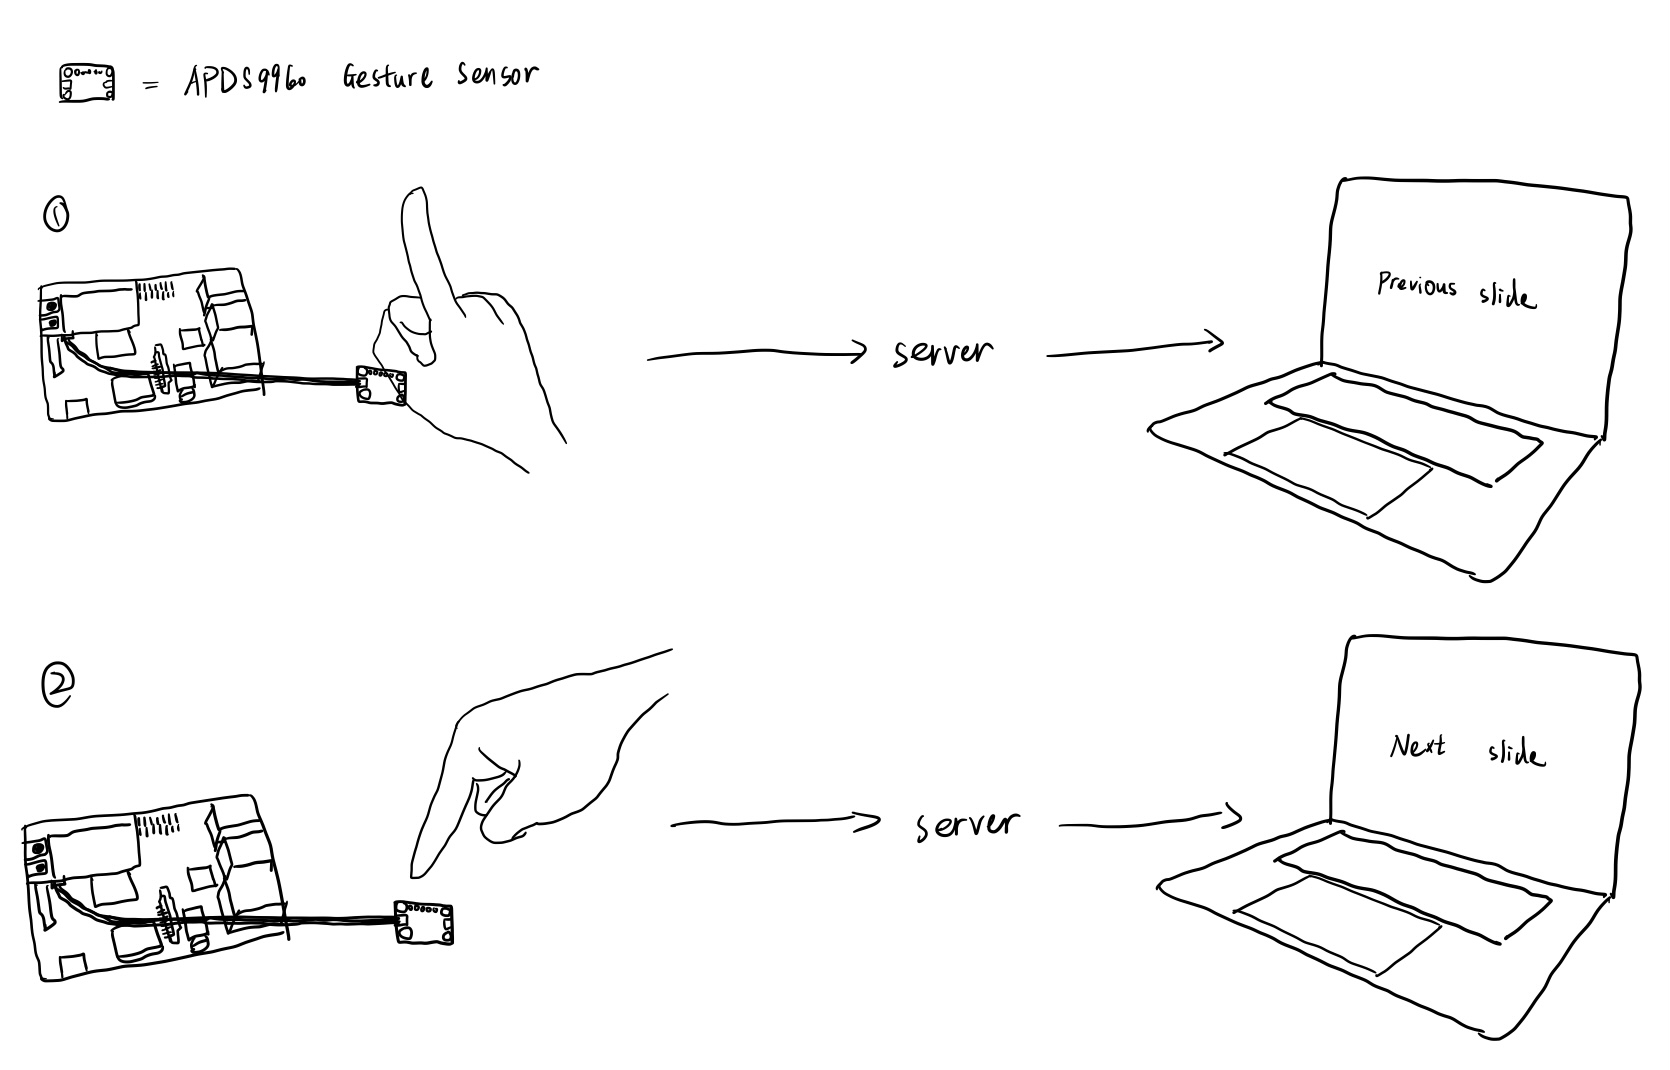
***2. Diagram the architecture of the system.*** Be clear to document where input, output and computation occur, and label all parts and connections. For example, where is the banana, who is the banana player, where does the sound get played, and who is listening to the banana music?
The architecture would be explained down here below.
***3. Build a working prototype of the system.*** Do think about the user interface: if someone encountered these bananas somewhere in the wild, would they know how to interact with them? Should they know what to expect?
Our design is very easy in terms of user interface. If users encounter our design, they only need to wave their hands up/down or left/right to the gesture sensor to suggest which remote signals they want to send, and raspberry pi would help them to inform the server side to move to previous or next slide of the presentation slides. Up/left means previous slide and down/right means next slide.
***4. Document the working prototype in use.*** It may be helpful to record a Zoom session where you should the input in one location clearly causing response in another location.