Cmi5
cmi5 is a xAPI profile for managing xAPI-based courses and activities with learning management systems (LMS). cmi5 is intended to be the succesor of SCORM, providing more flexibility in the tracing, supporting multiplatform and distributed architectures. With cmi5 it is possible to launch native or web xAPI-based contents from the LMS, trace all the interactions from the students inside of the activity and report results and scores towards the LMS. Using Xasu with cmi5 enabled will allow you to package your Unity application and simplify/automatize the management of activities with it and its data collection. Plase check the following links to learn more about cmi5:
- Cmi5 overview: https://xapi.com/cmi5/
- Cmi5 specification: https://aicc.github.io/CMI-5_Spec_Current/
- cmi5 and SCORM comparison: https://aicc.github.io/CMI-5_Spec_Current/SCORM/
Games and applications using Xasu can support the cmi5 protocol. According to cmi5, any content can be lauched through URIScheme protocol (basically, web links) from the LMS. This is the API Xasu uses to receive the cmi5 parameters.
For cmi5 to work, Xasu creates a custom URIScheme for the game based on the Unity Player configuration bundle name.
<bundle-name>://
To bind this URIScheme to the system, Xasu uses different techniques depending on each platform. In summary:
- Windows: Xasu automatically creates an installer in the
Installersfolder of the Unity Project that adds the URIScheme to the registry and also will include a Launcher.exe file that helps with the parameter management. - Linux: - Not yet supported -
- Mac: Xasu adds the URLScheme to the /Contents/Info.plist file of the MacOs build using the CFBundleURLSchemes tags.
- Android: Xasu adds the URLScheme to the AndroidManifest.xml file.
- iOS: Similar to Mac, Xasu adds the URLScheme in the Info.plist file.
- WebGL: Since WebGL is a native web platform, Xasu will read the parameters from the URL. Once the game is built and installed in the system (when installation is required), cmi5 can launch the game by using the cmi5.xml package manifest.
To enable it in the configuration file you can use the following minimal configuration:
{
    "online":"true",
    "auth_protocol": "cmi5"
}
Note that neither "lrs-endpoint" nor "auth-protocol-parameters" are required to use cmi5.
When using cmi5, all xAPI traces sent to the LRS have to be either "cmi5 defined" or "cmi5 allowed". Sending any statement that do not fit in any of the categories will cause the trace to be discarded and may cause Xasu to stop sending more traces. Nevertheless, Xasu will help you to prevent this by automatically configuring most of the statement aspects to make them comply with the cmi5 profile.
All of the resources required to use cmi5 (such as the registration value, the LaunchMode or the MasteryScore) are automatically gathered in the Cmi5Helper static class.
The cmi5 defined statements are the main cmi5 traces that communicate information to the LMS about the state of the activity. These traces must include the context.registration field in the trace and the cmi5 category to the context.contextActivities.category. Furthermore, specific cmi5 traces may include more categories and extensions to be cmi5 defined.
The statements sent by the AU include (please note that the following list do not include the list of statements sent by the LMS):
- Initialized: This statement MUST be sent by the AU (your game or application) at the beginning of the activity. This statement is launched automatically when Xasu initializes having cmi5 enabled.
-
MoveOn Traces: These statements are sent by the AU to determine the activity result depending on the MoveOn criteria of the activity. In these traces, special categories and extensions must be added to the traces to become cmi5 defined.
- Passed: Indicates if the player has passed the activity. An score must be added in the trace scaled to the MasteryScore property.
- Failed: Same as passed, but when the score obtained is less than the MasteryScore property you must send the Failed trace instead.
- Completed: Indicates that the activity has been completed either it has passed or failed.
- Terminated: This statement MUST be sent by the AU at the end of the activity, either it has been completed or not. This statement is launched automatically when Xasu finalizes having cmi5 enabled.
The rest of the statements sent to an LRS while using the cmi5 profile have to be cmi5 allowed to be accepted by the LRS. Otherwise, the LRS will reject the statement.
To make a trace cmi5 allowed, it has to include the context.registration property in the context of the statement. To simplify this, when using cmi5 the Xasu DefaultContext property will include the ContextTemplate provided by cmi5 during the launching with the context.registration property setted.
Thus when any trace is enqueued to Xasu not having its context property setted will automatically become cmi5 allowed when cmi5 is enabled.
When using cmi5 with Xasu, both Initialized and Terminated statements are sent automatically (the duration of the activity is calculated automatically). Other traces such as Passed, Failed or Completed can be sent using the High-Level API.
Some examples of its usage are found below:
    // Sending Completed trace
    await Cmi5Tracker.Instance.Completed(Time.realtimeSinceStartup - initTime)

    // Sending Passed or Failed based on MasteryScore
    if (score < Cmi5Helper.MasteryScore)
        await Cmi5Tracker.Instance.Failed(score, Time.realtimeSinceStartup - initTime);
    else
await Cmi5Tracker.Instance.Passed(score, Time.realtimeSinceStartup - initTime);To decide which trace to send you can use the Cmi5Helper.MoveOn property, for instance:
    switch(Cmi5Helper.MoveOn)
    {
        case MoveOn.Completed: /*...*/ break;
        case MoveOn.CompletedAndPassed: /*...*/ break;
        case MoveOn.CompletedOrPassed: /*...*/ break;
        case MoveOn.Passed: /*...*/ break;
        case MoveOn.NotApplicable: /*...*/ break;
    }
To simplify the creation and configuration of the context different autoconfigured contexts are present in Cmi5Helper:
        // Default ContextTemplate (this context does not guarantee statements to become cmi5 allowed!)
        public static Context ContextTemplate { get; set; }
        // Minimal cmi5 allowed context
        public static Context Cmi5Allowed { get; set; }
        // Minimal cmi5 defined context
        public static Context Cmi5Context { get; private set; }
        // Context for traces with MoveOn (Completed, Passed or Failed)
        public static Context MoveOnContext { get; private set; }
        // Context for traces with MasteryScore (Passed or Failed)
public static Context MasteryScoreContext { get; private set; }To use cmi5, you MUST upload a cmi5 package to the cmi5 supported LMS. In this package, a URI Scheme link to the game has to be present inside, but for this link to work some extra steps may be required in certain platforms.
Specially, in Windows for URI Schemes to work it is necessary to use an external installer that makes the appropiate changes in the registry for the scheme to be recognized.
When building the game for Windows, after the Build process is completed, Xasu will try to create a Windows installer using the WixSharp library. WixSharp is a library wrapper to use the Wix library to simplify the creation of .msi installers from C#.
Since WixSharp is normally not present in the system, Xasu will ask the user to download the binaries and decompress them in the Unity project root folder. These binaries only work in Windows, so make sure you use a Windows system when creating Windows installers. If WixSharp is detected, Xasu will create the installer straight away.
The prompt will look like this:
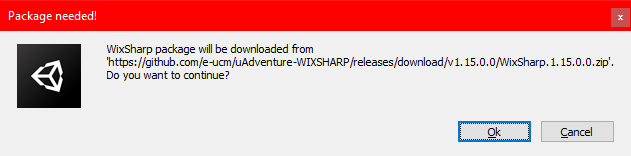
After the package is downloaded and if the build is successfully generated, the installer will appear in the Installers folder.

NOTE: This process will be automated in future versions.
To launch the game from a cmi5 the Assignable Unit (AU) has to point to the game url. This is normally defined in the cmi5.xml package manifest.
This cmi5.xml package manifest is included inside of a Zip file along with the required contents.
Creating a cmi5 package for Windows, Mac, Linux, Android and iOS In this platforms, the game MUST be installed in the system manually. Afterwards, the user can use the cmi5 link to launch the assignable unit.
This cmi5 link is defined in the tag of the . For cmi5 it has to follow the next format: ://cmi5/
A minimal cmi5.xml can be found below:
<?xml version="1.0" encoding="utf-8"?>
<courseStructure xmlns="https://w3id.org/xapi/profiles/cmi5/v1/CourseStructure.xsd">
  <course id="http://e-ucm/examples/game-course">
    <title><langstring lang="en-US">Course Title</langstring></title>
    <description><langstring lang="en-US">Course description</langstring></description>
  </course>
  <au id="http://e-ucm/examples/game-au" moveOn="CompletedOrPassed" masteryScore="1.0">
    <title><langstring lang="en-US">Game Title</langstring></title>
    <description><langstring lang="en-US">Game Description</langstring></description>
    <url>com.DefaultCompany.XasuGame://cmi5/Xasu%20Game</url> <!-- <bundle-name>://cmi5/<url-encoded-exe-name> -->
  </au>
</courseStructure>
This cmi5.xml file is then compressed alone in a zip file and uploaded to any cmi5 compatible platform.
As long as the game is installed in the platform the web browser will ask to open the game.
Creating a cmi5 self-hosted package for WebGL In contrast to the other platforms, WebGL content can be run inside of the Web browser. For this reason, it is also possible to include the WebGL content in the cmi5 package and let the LMS host the content.
A Minimal cmi5.xml for WebGL content is found below. In contrast to the previous example, the url just points to the index.html file:
<?xml version="1.0" encoding="utf-8"?>
<courseStructure xmlns="https://w3id.org/xapi/profiles/cmi5/v1/CourseStructure.xsd">
  <course id="http://e-ucm/examples/game-course">
    <title><langstring lang="en-US">Course Title</langstring></title>
    <description><langstring lang="en-US">Course description</langstring></description>
  </course>
  <au id="http://e-ucm/examples/game-au" moveOn="CompletedOrPassed" masteryScore="1.0">
    <title><langstring lang="en-US">Game Title</langstring></title>
    <description><langstring lang="en-US">Game Description</langstring></description>
    <url>./index.html</url>
  </au>
</courseStructure>
The cmi5 package is then created by adding the cmi5.xml file into the WebGL build folder root (at the same level of the index.html file), and zipping (.zip) all together.
An example of the "package.zip" folder structure could be:
./Build/
./StreamingAssets/
./TemplateData/
./cmi5.xml
./index.html